Showing posts with label Gear. Show all posts

Saturday, April 28, 2012

Gear: Upgrading the Shop, Il Grotto di Volpe! (Fox Cave!)

With the move back to the States from Italy, we were looking forward to moving back into our house.  Granted, we knew there would be some work associated with cleaning up after the renters, but we also knew that our "fresh start" would also provide an opporunity to work on some things around the house that we never had the opportunity to improve when we were actually living there.  For example, we had talked for years about refinishing the hard wood floors, however this is a daunting task when you actually occupy your house.  What are you going to do, move everything to one side of the house, sand and stain the floors, move everything to the refinished side, and repeat?  Sounded messy and like a lot of work, so as you can expect, it never materialized.  Well, with all of our stuff still in transit and the house empty (sans tenants), we took the grand opportunity to refinish all the floors.  Still quite a mess, however it's a lot easier cleaning up just a few ceiling fans and window sills compared to EVERY ITEM in the house!

So, with this wonderful opportunity to improve some stuff in the house, we decided to also have the basement repainted.  The basement is of the stone variety, without the smooth, dry walls of a poored concrete basement.  Over time mold and mildew had formed on the stone walls, so it was really in need of some Dry Lock paint.  Dry Lock is a special paint that seals up concrete and masonry walls, preventing moisture from seeping in, and also gives a nice clean appearance, as it's a new paint job!  So, with the basement getting a new coat of paint on all the walls and on the floor, I had to gut the workshop...which provided not only an opportunity to get a coat of paint on the walls, but also to rearrange and reorganize how the workshop is layed out.  My workshop was going to get a makeover!

The workshop: Before (Nasty Walls!)

The obvious first step was clearing out all the old cabinets, workbenches, and other items that had collected in the basement.  I was really surprised at the amount of storage I had in the basement, most of which was old kitchen cabinets.  I tore everything out and moved them out to the garage.  With the basement completely empty, the work crew that was also rehabbing our bathroom got to work cleaning and painting the floors and walls of the basement.

Workshop: Before (Too many cabinets!)

Once they were done, the basement looked like new!  Amazing what a new coat of white paint on a wall will do!  The floors were all a nice light gray.  With a nice blank canvas, I started by bringing the workbench and the best couple cabinets back into the shop.  One of the primary issues I was having with the previous version of the shop wasn't just the poor quality of cabinets, but also the amount of cabinets.  I had too much storage space, and too much counter space, to the extent that I was probably storing things that were better off thrown away.  And many of my larger power tools were difficult to get in the cabinets that weren't designed to hold large, heavy electrical tools.  With all that in mind, I decided that less was more.  I only brought down one cabinet to be permenantly installed in the shop, another cabinet to be mounted on casters as a sort of mobile work stand, and plans for improving the workbench to improve it's storage capacity.

The work bench had been just a thick piece of wood mounted on a sturdy steel frame, with under bench storage consisting of setting stuff on the floor or on the one rickety shelf (that consisted of a couple old boards).  While searching for ideas online (gotta love Google's Image Search!), I found some plans on a woodworking sight for sprucing up a work bench.  What immediately caught my eye was the large drawers mounted beneath the work surface, and the large caster mounted boxes designed to roll on the floor and act as heavy duty drawers to store power tools.
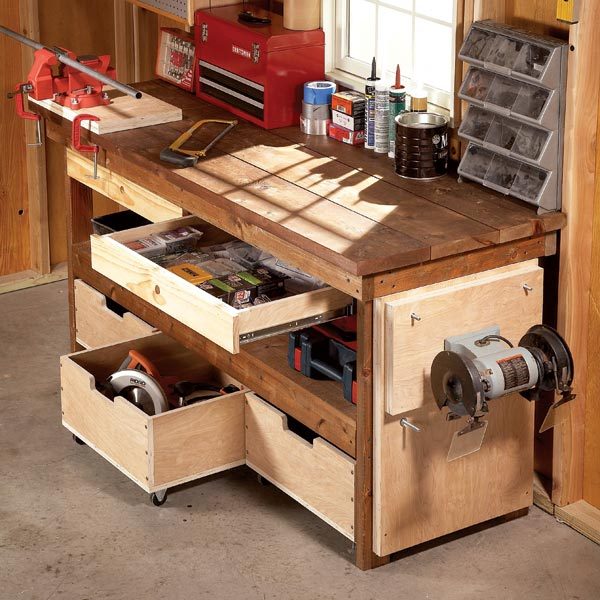
Here's the inspirational photo, from: 
http://www.familyhandyman.com/DIY-Projects/Woodworking/Workbenches/diy-workbench-upgrades/Step-By-Step
So, with an improved workbench in mind, I installed fewer cabinets to make my workshop better.  Almost immediately I noticed that the increased space allowed me to more easily work on projects.  And one of the first projects was improving the workbench.  I cut plywood for the drawers, making them as wide and as long as possible, to maximize storage space for items I'd use a lot, like drill bits, screws and other small hardware.  I kept them fairly shallow, so that they'd remain well organized and not turn into junk drawers.  As for the caster mounted "drawers" that were to roll on the floor, I made them deep enough to allow tool cases to fit securely in them, and long and wide enough to maximize the space under the workbench.  Overall, the four drawers effectively store most of my tools and their accessories.

The improved bench with large drawers mounted below the work surface and two caster mounted boxes (drawers) that roll on the floor and are great for storing large, heavy power tools.  
Closeup of the caster-mounted drawer.

With the workbench project complete, I moved some track lighting above the corner where I planned on setting up the bike rack, ensuring enough light while working on the bikes.  I mounted the one cabinet to the left of the bench, and another smaller cabinet above it, for holding small items and stuff I wanted to keep out of the kids reach, like paints and spray lubricants.  I painted some peg board black, figuring it would offset nice with the new white walls, and also highlight the tools on the board well.

Before
After

On the far side of the shop I installed a double-decker bike rack to hold two bikes, and next to that I installed a wood shelf system from IKEA.  This area had previously held one cabinet that was used to store painting supplies.  The corner wasn't necessarily a mess, but the corner wasn't really "used" in the sense that the stuff stored there was rarely used.  It was kind of a "permanent paint storage" after the wife and I painted.  Storing the paint in the garage freed up the space, ensuring that the new shelves and the bike rack would allow easy access to tools and supplies that were used more often.  My wife described this corner's improvement as looking "less scary".

The "scary" corner, before...
...and After: now with the double-decker bike rack and ample storage thanks to a shelf system from IKEA.
Kitty Corner from the bike repair stand, I cleaned out the area around the work sink, which had previously held floor and wall mounted cabinets to the left of the sink and to the right of the sink a table that held a miter saw.  The previous configuration provided too much storage space, and took up too much of the room.  The saw produced a lot of dust in the basement, so after the basement was painted, I decided to not replace any of the cabinets permanently along this wall, and to keep the miter saw in the garage.  To provide some storage and a more flexible workspace, I built a mobile workstand out of two of the smaller cabinets.  I took two cabinets, one base cabinet and one drawer base cabinet, screwed them together, flipped them upside down and mounted 3/4" plywood base on the bottom.  On the base I mounted four brake equipped casters.  I flipped the now mobile cabinets back over, upright, and screwed 3/4" plywood on the top for a workspace.

I built a duplicate to remain in the garage, which is separated from the house, to hold the miter saw that will spend most of its time out there.  To provide some flexibility with where the miter saw operates, I mounted it on plywood, and drilled a hole in each of the four corners.  I used these holes as guides, drilling matching holes in both of the mobile workbenches, one in the garage and one in the basement shop.  I removed the plywood mounted miter saw, set it on it's side, and glued dowels into the holes, with the dowels facing down, like spikes.  These "spikes" or dowels fit into the mobile workbench and ensure a secure and consistent fit.  

So, eliminating the excess cabinets proved more space for working, and an opportunity to build a more flexible storage and working platform.

Standing by the bike repair stand, looking back: more peg board to hold paint brushes and helmets, work sink, and caster mounted work bench.
I had recently upgraded to a new laptop.  Faster, more storage, all that...  But the old laptop still worked fine, so I thought I might re-purpose it for use in the shop.  Why, you might ask?  Well, for a couple shop specific "tasks".  First, music.  The hard drive on this laptop can hold more than enough music, and with the growing number of songs on YouTube, a WiFi enabled laptop could allow me to enjoy "music videos" while I'm working.  My playlists on YouTube are free, and there's nearly endless variety.   Not to mention Pandora, or many other web based music services.

The second important aspect of making a laptop computer an integral part of the shop is the tremendous number of "How-To"s available on the internet.  From PDFs that explain the intricate details of a suspension fork, to YouTube videos that go step-by-step through the complicated process of bleeding air bubbles from your hydraulic brakes, the notion of having a "shop computer" is priceless.  I had been bringing my nicer laptop into the shop while working on various projects, but I was always worried about getting it dirty or worse broken.  Well, I wanted to repurpose this old laptop so that I wouldn't have to worry about either of those issues.

I thought about building a slide out drawer like device to house the laptop, and while it would have been awesome to have that "disappear" under the work bench, it posed a number of issues.  The laptop would be more permanently affixed to the drawer, reducing the flexibility of having a more portable laptop in the shop.  Which leads to the next issue: where would I mount the drawer mounted laptop?  I would want it accessible so that I could view diagrams while working on the bike, or any other work surface.  As I thought about the practical issues of using a computer in the workshop, I decided on a more mobile solution, and one that would be easier to construct, too.

I built an angled mount for the computer.  It puts the laptop at a 25-30 degree angle, making it easier to type while working, and also shortening the depth of the computer, too, which ensures it takes up less of a footprint on the workbench.  I drilled some holes in the plywood surface that is the mount, to ensure that the computer gets some airflow.  Next, I painted the laptop mount.  Finally, I mounted the laptop's old power cord adapter underneath along with a set of USB speakers.  The entire unit now sits on the workbench, right next to the toolbox, which says a lot about how the rapid access to information improves the ability to fix and maintain just about anything.

The new and improved shop looks cleaner, has better lighting, but features less storage space than its predecessor, which I believe is a better space for actually working on projects.

Completed Shop: improved workbench, laptop computer mount, track lighting above the bike repair stand, with the Fox symbol as the finishing touch!    

Monday, April 16, 2012

Prophet Upgrade Project: Phase II

Well, after returning from Italy, and with a good three years of hard riding on the bike, it was definitely in need of some TLC.  The bike was really in need of two major upgrades or repairs: new rims and an overhaul for the fork.

I had done some research regarding the Prophet's Lefty fork, and I discovered that the TPC Max fork that came equipped with my 2005 Prophet could be upgraded to "PBR" (Progressive Bend Radius...whatever that means?!?).  What a PBR upgrade equated to me was upgrading the fork's spring from an actual "spring" to an air spring, which is more fine-tunable.  Also, most importantly, the PBR upgrade would provide me with a lockout feature on the front fork.  This is a feature I had on my previous mountain bike, a 2001 Jekyll, and it was a feature I rather enjoyed.  It was nice to lock out the fork on climbs or on pavement.  It was surprisingly useful, so it was a feature I was looking forward to getting on my "new" fork.

Top of the new/improved Lefty Fork, showing off the PBR controls.  The blue "Poptop"  activates the lockout and also exposes more of the red Rebound Adjustment knob that surrounds the "poptop".  Pushing the red Rebound knob down reactivates the fork.  Easy!  

As it turned out, much of the maintenance on Cannondale's Headshok forks is now accomplished at the Cannondale factory.  However, my research on the potential for fixing and upgrading my fork also uncovered a small New York based bike shop that specializes in fixing and upgrading Cannondale Headshok suspension systems.  Mendon Cyclesmith is the shop,and Craig is owner, operator, and Headshok expert.  So, I just removed the Headshok Lefty from my Prophet, stuffed it one of the many post-move-from-Italy boxes I had lying around, and shipped it off to NY.  To my pleasant surprise, Craig had it back to me in about a week!  Very fast service.  And the fork feels like new.  It's like butter!  And the added lockout feature is great.  There's a small "pop-top" button to hit, and that's it.  The fork is locked out.  The "pop-top" button releases the compression dampening adjustment knob that is beneath it.  To reactivate the fork, I simply pushing the larger compression dampening knob back down.  Piece of cake!  Actually easier to use than the previous Jekyll's method, which was a dial or switch on the top that had to be turned about a quarter turn to activate/deactivate the fork.  So, this option is battery free and easier than the old switch.  And it looks great, too.

Craig also re-greased everything, and got all the fairly complicated details of the Headshok in perfect working order.  As I said earlier, the fork feels like new, and considering how inexpensive it was for him to service it and upgrade it, I will be getting it service regularly by him, which he and Cannondale recommends to be once a year.

The second upgrade was new wheels!  Well, sort of...  Like the fork, I actually saved most of the wheels, or the most important part, the hubs, and had my local bike shop lace up a new set of rims.  I had been considering a whole new set of wheels, in fact I had started to settle on a sweet set of Mavic wheels.  But rather than go all out and get a new set of Mavics, I figured I spend half as much and get a great set of custom built wheels.  I brought the old wheels, which had slightly bent rims and spokes (did I mention they were well worn?!) and asked to get some Mavic XM819s laced onto the existing hubs.  The next day I received a call from the shop, and was told the XM819s would not be compatible, so they gave me a couple other options to consider.  I took those options to the "internets", and decided upon the "Stan's No Tubes ZTR Arch EX".  Wow. That's a mouthful!  My local bike shop, Big Shark, built them up, and I have to say, they look great!  I have not had the opportunity to give them a proper ride yet, but the test flights in the neighborhood were all successful.

Beautiful new wheels.

So, the Prophet is all set for a new set of adventures in Missouri and where ever else I may find myself!  Happy Trails!

...and a video demonstrating the Cannondale Lefty with PBR upgrade:

Sunday, October 16, 2011

Prophet Upgrade Project: Phase 1

I've had my Cannondale Prophet for over five years, and I've really enjoyed riding it.  That said, I was looking to improve the climbing capability on the bike by changing the rear shock with one that would "lock out".  The original shock, a Manitou, didn't include a lock out feature, and it's something I missed on the Prophet.  A previous bike of mine had front and rear lock out on the shocks, and I really liked being able to make the full suspension bike into a fully rigid bike on the road and on long climbs.  I really enjoyed the feature on that bike (a 2001 Cannondale Jekyll), and as such, I was ready to improve the capability of my  new(er) mountain bike.

I looked at the available rear suspension shocks on the market, and determined that the Fox Float RL would fit the bill, in that it features a lock out, rebound adjustment, and is reasonably priced.  I determined that the Prophet frame required a rear shock to be 7.875 inches long and have 2.0 inches of stroke.  Fox's Float RL came in this variety, so I ordered it online.

Fox Float RL

When the shock arrived in the mail, I was "shocked" to find that the original shock brackets (called shock reducers) didn't fit my new shock.  Searching online, I found that Cambria bike had them available, so I ordered them online.  When they arrived in the mail, I was able to install the new shock!

Needless to say, I've enjoyed the new shock, with a recent ride on Monte Matese allowing me to lock out the rear shock, effectively making my full suspension bike a hard tail to more efficiently climb the 4265 foot ascent.

Next on the list for the upgrade:

  • New wheels: My wheels are in pretty bad shape after 5+ years of use and abuse.  They are overdue for a rebuild.  Do I get all new wheels or just rebuild on the existing hubs?  If I get new wheels, I'm thinking about the Mavic Crossmax ST's.  Clearly, rebuilding on the existing hubs would provide a great ride at a fraction of the price of the Mavics.  ...and I'd also not have white hubs (that will look horrible if I don't keep them spotlessly clean).  As you can tell, I'm leaning toward the rebuild option.  
  • Fork Rehabilitation: my Cannondale Lefty TPC Max is in dire need of some serious maintenance after 3 serious years of use and abuse in Italy and Europe.  These forks work great, but are very difficult to work on if you don't know what you're doing.  Clearly I don't.  :)  Luckily, there's a bike shop back in the states that specializes in fixing and upgrading Lefties.  So, I'm thinking about shipping my fork off to Mendon Cyclesmith for a complete rebuild and upgrade.  I'm thinking about getting the "guts" upgraded to PBR, essentially converting my front shock from spring to air spring, and providing a lock out capability.  

Friday, April 22, 2011

Gear: Posca, the Roman Legion's vinegar based Sport's Drink

My recipe for Sports Drink works pretty well, at least I’ve been happy with the results, both in its taste and how it makes me feel during a ride.  It includes vinegar as an ingredient, which many athletes may find unusual.  I got interested in Vinegar’s ability to assist with muscle recovery, and found out that it has been used in this regard for thousands of years.  Rome’s legions used vinegar derived from old wine, mixed it with the local water to kill any harmful bacteria and also to improve the flavor.  The Roman’s referred to this drink as Posca. 

Turns out modern science has found that vinegar is an excellent way to relieve or prevent muscle cramps.  Here's an interesting study on the benefits of vinegar.  Coaches and athletes have been drinking pickle juice for years for this very reason, and scientists are just beginning to understand the benefits of vinegar for athletes.  With all these benefits, I wanted to see if it indeed worked.  Over the course of a few rides, I worked out a recipe that works well for me; it masks the flavor of the vinegar, while providing the benefits of the sugar, salt, and vinegar (simple carbohydrates, mineral replenishment, and muscle relaxant, respectively). 

Try out my recipe below:

1 Liter of Water
4-6 Tbs of pre-sweetened Kool-Aid mix (adjust for your preference)
4 Tbs of Vinegar
¾ tsp Salt
“splash” of Lemon juice

An update to the recipe, less complicated and probably just as good:

1 L of Water
2 Packets of Kroger drink mix (small sports drink mix packets)
1/2 cup of Apple Cider Vinegar
3/4 tsp salt
splash of Lemon Juice


Tuesday, April 19, 2011

Gear: What's in the bag...

Packing for any trip can be tricky, and while the average mountain bike is a rather short trip, it can be difficult to determine what to carry along for the ride.  In writing this entry, hopefully you'll gain some insight to what's been useful for me to have along, and please, if you have any other suggestions for great items to carry, let me know.  

Starting with the bag, I wear a Camelbak Mule NV, which provides enough room for me to carry the essentials without being too big to encourage me to be too prepared; the more "prepared" you are, the more you typically carry.  And while it's usually good to "be prepared", the Boy Scout Motto can lead to carrying everything, including a kitchen sink...and household appliances tend to be heavy.  So, I like to carry the tools and nutrients absolutely necessary, plus a little extra just for "insurance".  The Camelbak Mule features a large pouch for mounting the 3 liter water reservoir, a large zippered compartment, a smaller zippered compartment featuring organizational pockets, a large pouch, and a smaller pouch cinched by a drawstring strap.  The entire bag can be cinched by four drawstring straps, and these are great for binding everything together as well as cinching down any items in the large open pouch (where the water bottle is located in the picture below).  

Camelbak Mule
The large zippered compartment lacks any organizational pockets, so I typically use it to store additional repair items or food.  On longer rides, I'll use the large compartment to carry an additional water bladder, and the compartment is large enough to fit a 3 liter bladder.   I've enjoyed the flexibility the large compartment provides me. 

The large pouch that is sandwiched between the large and small zippered compartments has been great for stuffing extra water bottles or clothing items like a windbreaker.  This pocket/pouch has been great for holding items that are too bulky for storing internally or items that I want repeated or quick access to while riding.  The items are secured by the four cinch straps, which tighten everything down in the bag.  This pouch is large enough to carry two bottles of Italian Champagne (Prosecco).  ...a typical item carried for a New Year's (Capodanno) ride!  :)

The Camelbak Mule can carry everything for your ride, including two bottles of Prosecco!
The smaller zippered compartment features organizational pockets which have been great for storing tools, repair items, utensils, and keys.  
Last, there's a small pouch on the very outside of the bag.  It's relatively small, and is kept secure by its own cinch strap.  Because of its size and ease of access, I typically store a small wrench for adjusting my suspension.  

The outside of my bag features a small first aid kit that's zip tied and a tire pump that's velcroed to the outside of the bag.  By externally mounting these two relatively bulky items to the outside of my Camelbak, not only do I prevent them from taking up room on the inside of the bag, but they are also more easily accessible on the outside of the bag and they also advertise my first aid and repair capabilities to others on the trail.  Initially I kept these items on the inside of my bag, but I've liked having them externally mounted, freeing up room in the bag for other stuff.

So, as far as what I fill up my bag with, I break it down into Repair Items, Food, and First Aid.  My first aid kit is externally mounted on  my bag, which provides easy access and advertises to other trail users my ability to help.  I've organized my first aid kit using plastic bags to seperate and organize the specific items, as well as protect them from the elements.  Keeping the items separate in bags allows them to be labeled, making first aid faster and easier.  There's nothing like trying to find what you're trying to administer!  Organizing is the first step in providing first aid.  The little red pouch on my Camelbak features Gauze, ointments, pain pills in a plastic tube, and large and small self adhesive bandages.

I use plastic bags to segregate and label my first aid supplies.


As for food, it really depends upon the length of the ride how much I carry, but I always carry some combination of fruit, sandwich, and water.  If it's particularly hot or long ride I'll carry Gatorade in a separate water bottle (or two) in the large pouch on the outside of the Camelbak.  I don't put drink mix in the Camelbak water bladders, as mold, mildew and sea monkeys tend to start growing in it soon after.  I use a reusable Rubbermaid container to store sandwiches, and I'll take dried fruit in plastic bags.  Granola bars are also a favorite.  The Italians I ride with like to carry Ritter sport chocolate, a big plus at the top of the mountain!

Rubbermaid keeps the sandwich fresh and prevents it from being crushed in the bag.  A waterbottle allows me to mix the sports drink in something other than my Camelbak reservoir, keeping it fresh and clean (Sea Monkey free).

I keep tools and repair items on me at all times.  Tools of particular importance include a multi-allen, tire levers, chain tool, patches, and a "Leatherman" multi-tool.  I like carrying the "Leatherman" really for the pliers that it provides, but many of the additional tools it comes with are great, too.  The chain tool is small, light, and it's one of the tools that really has no replacement.  With a chain tool, a nearly impossible task of repairing a chain that has become separated becomes an easy task.  Without it, you are quite literally up a river without a paddle.  Or a trail without a tool. Of course I take an extra inner tube (or two) along with a patch kit.  Thorns (spina, in Italian) are common in southern Italy, on the many cacti and other "spina" equipped plant life, so I carry enough to get me through and help other riders.  One tool that many folks don't consider taking is an eating utensil.  I have a little mini-spoon which has been great for eating canned fruit or anything requiring something other than my fingers.  I also include a nifty little multi-tool that I received as a gift at a conference; it looks like a credit card but includes a blade, wrench, bottle opener, etc.  It doesn't take up any space, so I include it in the kit.  Last, but not least, I have a little tool wrap that my beautiful wife sewed up for me.  This tool wrap not only keeps my tools organized and quick to access, but it also keeps them safe.  Prior to the tool wrap, I had some tools wear out and break due to the constant vibration from riding.  The wrap cushions all the tools and protects them, ensuring they are ready when you need them.

The tools and other repair items.
Some optional items that I'll carry include a shock pump for adjusting my suspension on the trail, extra food, and as I mentioned earlier, extra water in a water bottle or an additional Camelbak bladder.

Wednesday, January 28, 2009

Include Music with your Ride: Homemade Speaker from iPod Earbuds


I really enjoy listening to music, and I thought that injecting music into my bike rides would provide me with more opportunities to listen to music. However, I didn't want to use earphones or earbuds, as they would eliminate any ability to hear traffic, or other surrounding sounds. This was a concern for both safety associated with hearing things around me and the enjoyment of listening to nature.

So, I figured I could get an iPod Shuffle, and hook it up to an external speaker that would allow me to listen to music without completely cutting off the rest of the world's sounds. As I looked at external speakers, I noticed that some of them took batteries, while others ran off of the iPod's power. I didn't want to have the added complexity of needing batteries, so that ruled out the battery powered/amplified speaker. And, as I considered the other external speaker option, I figured I could arrange the stock iPod earbuds to work as an external speaker. By modifying the earbuds into speakers I'd save some money and probably get a solution that would better fit my needs!

I started by cutting cardboard into a small rectangular shape, slightly smaller than the iPod Shuffle. I figured, that when the wires were wrapped around the cardboard, the final shape would be equal in size to the Shuffle. I once saw a carpenter wrap a long power cord on a rectangular piece of plywood that had V-shaped dents cut into it, ensuring the cord would have plenty of surface area to gather. I borrowed this idea for my small piece of cardboard, trimming concave 'dents' into the short sides of the cardboard. These dents will ensure that the wire will have a place to gather, and not uncoil off the ends. I started wrapping the wire by placing the earbuds on the cardboard, and used the wires to secure both of the earbuds together and onto the cardboard. I left about a foot of wire loose at the end, ensuring the wire would reach to it's final destination: the Shuffle. After the wires were securely wrapped and the earbuds arranged on the cardboard, I wrapped the entire bundle in electrical tape, which will keep the wire from unraveling and keep the earbuds in place. The tape will also provide some protection from the elements. I temporarily secured the new 'speaker' to the shoulder strap of my hydration pack using a short velcro strap (which incidentally came with an old bike pump) and ran the wire down toward the Shuffle which temporarily clamps onto the shoulder strap.

The entire setup works great. I can easily adjust the volume and navigate songs while riding the bike, thanks mainly to the placement of the Shuffle's raised control surface that allows me to differentiate 'play/pause', 'volume', and 'advance/rewind' all by touch. The speakers are located too far back while standing, however when riding, they are located perfectly, just behind the ear. Now I can hear my music as well as the surrounding noise of the world, whether birds or cars, keeping me both in tune and out of trouble.

Saturday, July 26, 2008

Gear Review: $10 Shopping Mall Kiosk Sunglasses:

Sunglasses from the mall always work better than any pair purchased for more through any specialty retailer. Why, you might ask? Well, first off, you can get a pair for a mere ten dollars, rather than $110 at a specialty store. Sometimes the Kiosk at the mall has a deal for two pairs. And price is important. It would be one thing if not all the sunglasses were made in the same factory in China, but they are indeed made in the same place. I don’t feel like paying an extra fee to cover Oakley’s marketing expenses. As I was saying, price is important. Sunglasses are nearly disposable, especially mountain biking. If you drop them, and they explode on a rock, do you want to focus on the $100 dollar bill you just threw away, rather than focusing on the awesome ride or the dangerous precipice that you are trying to avoid falling off of? Additionally, the hundreds of dollars you save on sunglasses can be spent on stuff that actually provides a marked advantage for the money: shoes, hand made bike frames, suspension, etc.

Another reason is variety. While specialty retailers that carry sunglasses may have a few name brands, the sunglasses they carry will not compare in variety as well as the mall kiosk. Different faces wear sunglasses differently: as such, it is best to be able to try a bunch of different sunglasses on for size. Different lenses work well for different situation, for instance, you may want to see if you can get clear lenses for night riding or shady forested areas. If you find a pair that fits well, and comes in a few color options that you like, I usually will pick up two pair, especially if they provide a discount for doing so. This way I use the first pair, and save the second pair for when the first are lost or broken. I have even seen a good deal on goggles, which are great for winter bike commuting. Most specialty stores would be hard pressed to match the variety available at the mall kiosk.

Sunglasses at the mall kiosk are almost as good in quality as the ones in specialty stores. I believe that the lenses in specialty store sunglasses are probably better than those available at the mall kiosk. I always try on the sunglasses at the kiosk, checking for fit, and to ensure that the lenses do not distort light or vision. I will also set the glasses on a level surface to ensure they are well constructed, and again examine the lenses to see if they distort light. An easy way to check distortion is to see if a straight line (edge of table surface) ‘breaks’ from distortion caused by the lens.

Sunglasses from the Mall Kiosk are superior in many ways. They reduce your concern for damaging the eyewear out on the trail, and allow you to focus your time, money, and energy on things more important than shades: bikes!