I purchased this bike in fall of 2009. I originally purchased it in Italy to replace my cyclocross road bike. I lived atop a mountain (literally) there, and finishing each ride going up my 45 degree drive way was punishing. So, I thought a bike like this would make it easier to climb. Especially with a child on the back. I put a European child seat on the bike, a design I haven't seen available in the US, that allows the seat to be removed with the touch of a button. So, this bike made it possible to grind up the long hills, a feat I was unable to accomplish on the higher geared road bike.
Turns out this bike is great for commuting, too. I love it! We just moved to Colorado, but while we were living in Saint Louis for six months I enjoyed commuting 6 miles each way to work on this bike. It's great for commuting! ...in fact, considering that I've been bike commuting regularly for over ten years, I should have bought one sooner! Instead, I had been riding older, used bikes. As you'd imagine, I end up spending more time and miles on the commuter bike than my fancy and expensive mountain bikes. So why did I ride, old, worn out, crappy commuter bikes, bikes I typically rode more often and further than my new, light, and wonderfully functional "recreational" bikes? I can't answer that, but I did alleviate it! I bought a Cannondale Bad Boy.
What makes this bike so terrific for commuting? It's the mixture of mountain and road bike parts... The frame and drivetrain are from a mountain bike, ensuring the bike is relatively relaxed to ride, and it can easily climb any hill. The disc brakes offer great stopping power in all conditions. Oh, don't forget the front suspension, also from it's mountain bike "roots". You can turn the suspension on or off with the flick of a switch. Having the ridged fork is great for speed, but when you want to smooth out a rough street, just turn the switch, and you get to enjoy the benefits of suspension. Meanwhile, the road wheels make this bike incredibly fast! They're taller, and slimmer...ensuring less rolling resistance. I've installed Michelin's Pilot Sport tires, with the Protek HD, to provide better traction on wet roads. This was key for safety and performance in Italy, where I found the roads to be very slick with even a bit of dew, let alone rain. So, these tires provided the appropriate traction in a country where they put slick marble in the asphalt!
I love this bike, and I look forward to commuting to work in Denver!
Well, after returning from Italy, and with a good three years of hard riding on the bike, it was definitely in need of some TLC. The bike was really in need of two major upgrades or repairs: new rims and an overhaul for the fork.
I had done some research regarding the Prophet's Lefty fork, and I discovered that the TPC Max fork that came equipped with my 2005 Prophet could be upgraded to "PBR" (Progressive Bend Radius...whatever that means?!?). What a PBR upgrade equated to me was upgrading the fork's spring from an actual "spring" to an air spring, which is more fine-tunable. Also, most importantly, the PBR upgrade would provide me with a lockout feature on the front fork. This is a feature I had on my previous mountain bike, a 2001 Jekyll, and it was a feature I rather enjoyed. It was nice to lock out the fork on climbs or on pavement. It was surprisingly useful, so it was a feature I was looking forward to getting on my "new" fork.
Top of the new/improved Lefty Fork, showing off the PBR controls. The blue "Poptop" activates the lockout and also exposes more of the red Rebound Adjustment knob that surrounds the "poptop". Pushing the red Rebound knob down reactivates the fork. Easy!
As it turned out, much of the maintenance on Cannondale's Headshok forks is now accomplished at the Cannondale factory. However, my research on the potential for fixing and upgrading my fork also uncovered a small New York based bike shop that specializes in fixing and upgrading Cannondale Headshok suspension systems. Mendon Cyclesmith is the shop,and Craig is owner, operator, and Headshok expert. So, I just removed the Headshok Lefty from my Prophet, stuffed it one of the many post-move-from-Italy boxes I had lying around, and shipped it off to NY. To my pleasant surprise, Craig had it back to me in about a week! Very fast service. And the fork feels like new. It's like butter! And the added lockout feature is great. There's a small "pop-top" button to hit, and that's it. The fork is locked out. The "pop-top" button releases the compression dampening adjustment knob that is beneath it. To reactivate the fork, I simply pushing the larger compression dampening knob back down. Piece of cake! Actually easier to use than the previous Jekyll's method, which was a dial or switch on the top that had to be turned about a quarter turn to activate/deactivate the fork. So, this option is battery free and easier than the old switch. And it looks great, too.
Craig also re-greased everything, and got all the fairly complicated details of the Headshok in perfect working order. As I said earlier, the fork feels like new, and considering how inexpensive it was for him to service it and upgrade it, I will be getting it service regularly by him, which he and Cannondale recommends to be once a year.
The second upgrade was new wheels! Well, sort of... Like the fork, I actually saved most of the wheels, or the most important part, the hubs, and had my local bike shop lace up a new set of rims. I had been considering a whole new set of wheels, in fact I had started to settle on a sweet set of Mavic wheels. But rather than go all out and get a new set of Mavics, I figured I spend half as much and get a great set of custom built wheels. I brought the old wheels, which had slightly bent rims and spokes (did I mention they were well worn?!) and asked to get some Mavic XM819s laced onto the existing hubs. The next day I received a call from the shop, and was told the XM819s would not be compatible, so they gave me a couple other options to consider. I took those options to the "internets", and decided upon the "Stan's No Tubes ZTR Arch EX". Wow. That's a mouthful! My local bike shop, Big Shark, built them up, and I have to say, they look great! I have not had the opportunity to give them a proper ride yet, but the test flights in the neighborhood were all successful.
Beautiful new wheels.
So, the Prophet is all set for a new set of adventures in Missouri and where ever else I may find myself! Happy Trails!
...and a video demonstrating the Cannondale Lefty with PBR upgrade:
I was intrigued when I first saw the design of the wooden balance bikes a few years ago. Unlike their American counterparts, the European balance bikes lack pedals, and instead of focusing on the locomotion skills associated with turning the cranks of a bicycle drive train, the balance bikes focus on developing equilibrium. Their design is simple, and focuses on teaching children how to balance on two wheels. Last year I purchased one for my son, and I've found it to be excellent for teaching Alex the fundementals of riding a bike.
I bought the bike at a specialty toy store in Amsterdam while on vacation with my wife. I knew that the vacation would be a bit of a bike fest for us (me!), as Amsterdam is so bike friendly. I took more photos of the dutch bikes than anything else, and we even rented a tandem bicycle to ride around town for an afternoon. While walking around town, we noticed one of the wooden balance bikes in a toy store, and we inquired the price, availability, etc. I liked the model that they had available, and it seemed to be a quality bike from what I could tell of the parts and construction. We were quoted 65 euro, and since we hadn't really shopped around for these bikes, we decided to do some comparison shopping. While continuing our tour around Amsterdam for a bit we came upon a bike shop, and I noticed some of these wooden balance bikes inside. We walked in and found that the bikes were very similar to the ones we saw at the toy store a few minutes before, and we inquired about the price. The shop employee quoted us a price, which I misheard as 75 euro. I turned to my wife and said, "that's 10 more than the toy store". She quickly corrected me, stating "they just said it was 175 euro, not 75!" thanks for the clarificaiton! Quickly realizing that the wooden balance bike at the toy store was a particularly good deal, we ran back and purchased one. The salesman at the toy store told us that the wooden balance bikes they carry usually quickly sell out after they receive them. Considering what the bike shops were selling these bikes for, we understood why! So, with our bike in hand, we headed back to the hotel to drop it off, so we weren't (or more precisely, I wasn't) carrying it around all day.
Fast forward a bit... when we brought it home, Alex was happy to have a gift from our trip (he stayed with Grandma and Grandpa). I assembled the bike, with Alex watching the whole time, and he got to check it out that day. Initially, he was unsure about the bike, with the size/fit an immediate problem. At the time Alex was quite a bit shorter than he is now, and he was barely able to straddle the bike with the bike's seat at it's lowest setting. Regardless, he was excited to have it, and instead of riding it he would push it around without straddling it, both in the house and outside. Initially I was concerned about him not straddling the bike, but he eventually got comfortable enough (and big enough) with the bike to straddle it and walk around with it.
Since these training bikes lack pedals, the kids can walk or run with the bike, developing their sense of balance as they run and glide. After watching him develop on this european training bike, I see now that the typical American kid's bike is probably too overwhelming for new riders. Specifically, I think the pedals/drivetrain and the act of balancing are probably too much for kids to take on at one time. The act of balance is probably the most difficult aspect of learning to ride a bike, when compared to the skill of pedaling. So it's a lot easier for the child to just focus on balancing the bike as they run and walk, a method of locomotion they are already well aquainted with prior to starting on these bikes. I think this makes it easier for a kid to learn how to ride a bike. I've witnessed this watching Alex on his wooden balance bike.
As Alex became more comfortable and confident with the bike he was gradually able to go from walking to running with it. It was at this point that Alex started to develop balance. He quickly learned that he could lift his feet and coast after running with the bike, experiencing the sensation of balancing on two wheels.
A couple of things may have helped him learn balance. First, I would ride my mountain bike along side him. I dropped my seat post height as low as it could go, and along with the relatively small frame size associated with my off road bike, I was able to imitate the fit of his bike. I could be seated while having my feet planted firmly on the ground. These minor adjustments to my bike allowed me to shuffle around on my bike in a way that was similar to his balance bike, allowing me to demonstrate walking and running with the bike, as well as the ability to pick up the feet and balance the bike while moving. Second, our parco has garden area with a couple of small, gradual descents that were also very helpful. These descents allowed him to coast for longer periods of time as he became more comfortable going fast on the bike. Coasting on these gradual descents allowed him to experience the sensation of balancing for a longer period of time.
The video above was recorded a few months after he began riding the wooden balance bike, and there are a few moments where you can see he is quite comfortable and capable of balancing on two wheels.
Alex's bike has held up well under his use and abuse. He has ridden quite a bit since we brought it home last summer. He really enjoys taking it outside, but he also has fun riding it (well, walking pretty slowly) in the house. All the parts and components of the bike have held up well. The bike is made primarily of laminated wood and held together by a series of bolts and fasteners. The simple construction makes for a durable product. His particular bike is painted in police colors, well, Dutch Politie colors actually. Some of the design features that I like include the integrated carry handle in the frame, the adjustable seat, and the wall-saving bumper equipped handle grips. The frame's integrated handle makes it easy to pick up the bike and carry it, which has been necessary a few times when walking a fussy rider back to the house for his daily nap. The handle is situated near the bike's center of gravity, making it very easy to carry (particularly helpful while dealing with a wild child). The adjustable seat has been great, extending the life of the bike. Granted, with the speed at which Alex is growing, this bike may not last much longer. It is designed for age 3-6. Alex just turned three, and we had to raise the seat to the top and final position!
The final feature that's proved useful was a bit of a surprise to me: the handle grips. I typically don't notice handle grips much, not even on my own bike, as they are typically just a soft grippy bit of rubber on the handlebar. There's not much to like about them, they just do their job, right? Well, the grips that came with his wooden balance bike have large rubber bumpers on the end to protect the bike and his hands and the things that it may (will!) rest on and crash into. The bumpers have no doubt saved the walls at our house, as well as protecting the wooden handlebar and Alex's hands from being hurt when scraping or crashing into walls.
This bike has been a wonderful way for Alex and I to enjoy the outdoors, and an excellent way for him to learn to ride a bike.
I’m living the dream. As a lover of mountain bikes, pizza, and great wine, I couldn’t have it any better. Two thousand nine found me moving half way around the world to Naples, Italy where I’d be working the next three years. I was excited to live in Europe, and as a cyclist, interested to find out about biking opportunities in Italy.
il gruppo di Carbonari
Before moving to Italy, I discovered some interesting videos created by a Neapolitan bike group while searching the internet. These videos were created by the Carbonari, a mountain bike club based out of Naples, Italy. Their videos featured Urban Assault on full suspension mountain bikes through the mean streets of Naples. They also had numerous videos of them riding in the mountains in/around Naples, including Mt.Vesuvius! Needless to say, I was excited to ride in Italy.
Without much difficulty, I found the group’s website, and sent an email asking to become a member. Marcello and Salvatore, the group’s founders and organizers readily accepted me. I looked forward to meeting them, and as I began the long process of moving to Europe, I continued to follow the group’s rides through the photos, maps, and videos they posted.
Upon arriving in Italy it took me a few months to get set up, at home and on the bike. During this time I got to explore southern Italy a bit, enjoy the Italian food and wine, too. I got out mountain biking on my own, locally on the volcanic island of Ischia, and further north in the DolomiteMountains around Lago di Garda, and the Alps near Garmisch, Germany. The Carbonari weren’t riding as a group during the summer, to avoid the heat. By late summer, though, the Carbonari had put together their fall riding schedule.
My first ride with the Carbonari was along the Mediterranean coast in Mondragone.We rode for over 7 hours, climbing up and over the mountain twice that day. While the heat and the mountain took its toll, I was invigorated by the awesome view of the Mediterranean Sea.
The first of many climbs at Mondragone
The trails were mostly jeep trails, with one exception: a strip of singletrack about 4 km long that traced downhill toward the Mediterranean below. Oddly enough, the trail was also being used by a boy on a Vespa scooter, despite the rough conditions of the trail. This single track descent lead to the far side of the mountain range. Once there, we took a short break at a small coffee bar. I grabbed some water, because I thought it was better to be safe than sorry, as I didn’t know if we were in for much more riding. And were we ever!
We climbed Monte Mondragone for the second time. We waited for over a half hour for the group to reassemble at the top, giving me an opportunity to try to get to know some of the folks. I had trail mix with me, a simple mixture of dried fruit and nuts that I put together before the ride. As the group started collecting at the top of the mountain, I soon discovered that the trail mix was very popular, as there were quite a few riders in need of an energy boost.
I was able to gain the respect of my fellow riders, not through my ability to converse, as my Italian was still very basic, but instead through positive attitude and good deeds on a particularly hot, hard mountain bike ride. The organizers, Marcello and Salvatore, seemed to appreciate my positive attitude. The beautiful Mediterranean, visible from the various points of our ride, helped keep a smile on my face.
Once the group reassembled, we were off. We continued along some winding trails, many of which appeared to be high altitude pasture, judging by the clumps of dung lying around. We had to cross a series of barbed wire fences, passing the bikes over the top and walking through the small pedestrian gate. Quite the adventure! There was a great sense of community and team work for the entire route!
The final descent back to the trailhead was a mad dash, with the entire group starting all at once. The crowded, fast descent mimicked the automobile traffic of Naples. Needless to say the downhill was fun and fast, and riding in a massive pack heightened the challenge. What a blast!
My second ride with the Carbonari was at Cassino. The mountainous terrain around Cassino was the site for a tremendous battle in WW2, and provided excellent terrain for a great mountain bike ride. The ride was on a beautiful fall day. It was perfect riding weather--a slight breeze brought the scent of sage and pine to the air.
That ride found us climbing for about three hours up pine tree lined gravel roads. As we climbed we passed a series of technical ‘stunts’ that a couple of the riders successfully negotiated. These stunts included ladders and jumps hidden just off the fire road in among the pine trees. Once we reached the top, we took a short lunch break, and pointed downhill into some of the best singletrack I’ve ever ridden. We descended for over an hour on the fast and technical singletrack, twisting our way down the mountain. We eventually started seeing more civilization, riding through small Italian villages--a sign that the ride was coming to an end.
After we made it back to the trailhead and packed up the cars, we drove down into Cassino forpranzo, or lunch. We met at what initially appeared to be a small coffee bar. It turned out that this small place could really put on a spread! We enjoyed a wonderful meal of mozzarella di bufala, pasta, french fries, a plate of assorted meats, and dessert followed by café (espresso). The ride took about 4 hours; the meal took about two hours. What an excellent way to finish the day: calories replenished!
The third ride with the Carbonari was in Formia, just up the coast from Naples. Our course took us through Formia and Gaeta, in the area known as Parco di Ulissi, or the Park of Ulysses. The riding featured singletrack, fire roads, and the paved streets of Gaeta. At the trailhead we started a short climb, weaving through the some great singletrack in the forest. After taking a short break at the top of the hill for the customary group photo, we started downhill toward the Mediterranean coast. Half way into the descent the trail emerged from the shady forest into the expansive green hillside with an amazing view of the sea. My eyes were filled with the expanse of blue in every direction--and all this while riding some great singletrack! Awesome!
Our next stop was at an old Roman port located in the park. The piers and steps are still intact, and we took some photos of the ruins. It was interesting to see that the local Italians that I was riding with were as impressed as I was with the Roman antiquities. After the port, we continued riding through the park on the various single and double tracks that were scattered about. We eventually reached a sheer cliff along the sea, where we stopped at an old Roman fort for another quick photo break.
The ancient Roman Port at Parco Ulissi
After the break, we continued through the park toward Formia and Gaeta. The pace really picked up on the road. Despite what many think about Italian drivers (they are a bit crazy), they are actually very respectful of cyclists. Needless to say our large group successfully navigated the streets of Formia and Gaeta without mishap. Once we passed through the center of Gaeta, we started climbing Monte Orlando, a large mountain in Gaeta that rests on the end of the peninsula that creates the town harbor. As we climbed the paved route to the top we took a couple of photo breaks, taking full advantage of the terrific view of Gaeta and the Mediterranean Sea from the heights of Monte Orlando. We continued on and took a lunch break on the top, where we all enjoyed whatever picnic we had packed. I noticed some of the riders eating traditional mozzarella di buffala and prosciutto sandwiches, which looked a lot more appealing than my peanut butter and jelly. We took another group photo in front of the large circular Mausoleum of Lucius Munatius Plancus, who I later learned was an advisor to Augustus Ceasar. All sorts of Roman history on this ride!
After lunch and the group photo, we pointed our bikes downhill to enjoy the singletrack that lay just off the paved and gravel road that lead us up to the top. We weaved down a couple technical sections, only to head up the mountain again to enjoy a couple more routes. Monte Orlando has plenty of trails, and we explored almost all of them, with the resulting GPS track looking a bit like my favorite pasta. Eventually we wound down the opposite end of the mountain on a gravel fire road. As we rode the switchback downhill, it was hard not to take in the view below of Gaeta, Castle Angioino-Aragonese, and the Mediterranean. As we continued downhill, the landscape soon changed from forested mountain to the old city landscape of Gaeta, with the gravel fire road turning to cobble stone street. Once at the bottom, we took another break: for gelato, the Italian ice cream. I love riding in Italy!
After the gelato, we hit the road back to Formia and Parco Ulissi, where our cars were parked. An excellent ride, and I left looking forward to all the future rides and good times with the Carbonari.
Italians are some of the friendliest people you’ll ever meet, and the Carbonari are no exception. I’ve reflected many times on how quickly the group accepted me, a foreigner, into their club. I suspect that a foreigner would not be so quickly welcomed in any social club in Northern Europe or the US. I’ve learned a lot from living and riding with the Italians, and I believe the Italians are onto something by being so loving and accepting of others. While I’ve experienced many cyclists in the US being judgemental about performance, type of cycling, and type of bicycle, it’s interesting to ride with the Carbonari, a cycling group of differing skills and equipment, and to see them all get along, even on difficult rides. It’s clear that Italians focus on enjoying life, and the Carbonari are about having a good time on their mountain bikes. Not only has the Carbonari shown me quite a bit of Italy, but they have reminded me of the basic joy that cycling brings. And that this joy can be shared, even without a shared language.
Be sure to check out the Carbonari’s website for group information, ride schedule, trail information in both Google Earth and GPS files, as well as photos and videos of their exploits at:www.carbonaribikers.com. Even if just to see how great the riding in Italia really is! Ciao!
Today I got to see my first professional bike race, and it was the 100th Anniversary of the Giro di Italia (Ride of Italy). First impresstions: I was overwhelmed with how fast the racers were riding, and equally impressed with how tight of a formation they could hold in the Peleton. There must have been close to 100 riders in the span of the average city bus. What was interesting about the experience, though, was how underwhelming it was... Remember the scene from Indiana Jones (raiders of the lost arc) where an arab swordsman threatens Indy for at least a minute, with intricate sword swirls and such? And Indy just shoots him... All that lead up for a split second, and undramatic finish. Well, ditto for the race. We get off the highway, near our house, and see a crowd formed up where the Poliza have cordoned off the street that they'll be racing on. As time goes by, a number of Poliza cars race by, ensuring the route is clear, and a few vans selling official 'Giro di Italia' t-shirts cruise by. The crowd continues to grow, with an increasing number of the locals buying shirts and such from the 'Giro' vans driving by. To add to the suspense, the crowd down the way starts cheering, just to see an old italian man riding his beater of a bike down the street. Ha! That 'Gotcha' happens a few times. Finally, team vehicles start cruising by, one of the most impressive being the Mavic (French wheel maker) vehicle: an all yellow sports-stationwagon (they don't have these in the States, unfortunately) with all yellow Cannondale racing bikes featuring all yellow Mavic wheels and all yellow seats/saddles. Looked like a chariot of gold. Then more Poliza cars and motorcycles. Then the lead group of cyclists race by, about 20 or so, with the crowd going nuts. About 3 seconds behind the lead group is the main body of the racers. I look frantically for Lance Armstrong in both groups, however my eyes and brain are not able to sort visual data as quickly as the group of cyclist ride by...as all this occurs in less than, oh, 10 seconds. Everyone then hopped in their cars, as the surrounding areas roads had become a parking lot. The area cleared out very quickly; it would have taken at least a half an hour in the states for the drivers to clear the area, but the Italians were able to get back to 'normal' very quickly. Simply amazing to see. Crazy how underwhelming it was, because of the speed involved, and my small perspective of the race. So many kilometers, and I saw mearly a few hundred meters of it. Overall, the experience was great. I'll be there again next year!
Friday, May 29, 2009
I found a couple Italian bike shops. I've been looking for a good bike shop, as my bikes arrived from the US of A in need of some minor repairs. The last shop I found, your standard fare of bike shop, does a great job on repairs. They trued my wheels and adjusted my brakes for about 15 euros, which I thought was a pretty good deal. Interesting thing about the bike shop, was that it took forever to find it. When I searched Google for the shop, it showed me one location, while the shop's website provided yet another location. Both locations that were provided by the internet were about 4 miles off of target! Crazy... I had to talk to locals and call the shop about 12 times to find it. Kind of frustrating, but they do good work, so I made sure to save the location in my GPS so to never lose them again! ...I thought it was interesting though that the bike shop's actual location was so far removed from where the internet placed them. I wonder if the address coding that works so well in the US for locations, isn't quite perfected here. I wonder if parts of the world should be locating business and homes by latitude and longitude. Probably more accurate where the government hasn't spend the time and money to regrid and rename streets for the benefit of GPS direction finding.
Otherwise, the other shop is very unusual, for an American. It's located closer to where I live, and they not only sell bikes manufactured by your standard European bike companies, but they also manufacture and sell their own line of bikes. The shop is pretty small, and they weld frames in the back area. They weld all their bikes out of steel, with a few of the high end road frames including carbon fiber seat/chain stays. I imagine the carbon components are purchased from a supplier and just glued in place. Overall, it's pretty interesting, as they create not only your typical fast looking Italian road bike, but also a slew of other bikes ranging from kids bikes, city bikes, tricycles and large cargo bikes. Pretty cool. Check out their site:
Yep, it's De Rosa bikes. Not the De Rosa you may have seen in the states, though. That De Rosa is from Milano in the north. This is yet another De Rosa di Pozzuoli. Interesting how the European style of manufacturing lives on (vs. American/Mass production), with local craftsmen building product for their local customer base. You'll notice the decal on the bikes highlight the geographic location of manufacture, unlike most products.
That's 29" mountain bikes, for the uninitiated: meaning that the wheels on the mountain bike are actually 29" in diameter rather than the standard 26".
Supposedly, they are better for riding off road than the mountain bike that typically has 26" wheels because the beach cruisers that were originally converted back in the 1970's to be the first mountain bikes came with them. So, it was a standard that was an accident and was never changed. So some marketing genius figured 30 years was a good period of time to wait and change the standard: for what benefit? Oh, the bike companies can sell a new line of bikes for bike shops to carry (in inventory!...remember, the bike makers make money off the interest that the shops pay on inventory!...just like car makers to dealers.)
While I don't know all the advantages of this larger wheel diameter, I do know the disadvantages associated with this larger, and more importantly, different wheel diameter. The larger diameter wheel will negatively impact your ride, our environment, and the economic well being of bike shop owners.
First, 29ers degrade your ride. Not the individual "ride and feel" associated with a bike, but rather your riding experience. 29ers make it more difficult for a large cycling group to benefit from common components. Imagine being out in the wilderness riding your bike with some friends, and a few of you have flats. Imagine you're the only one with a different wheel diameter. You've lost any potential 'economies of scale' by selecting a non-standard tube, tire, and wheel, as everyone in your mtnbike party will have extra tubes and such, but nothing to fit your goofy bike. So, 29ers add complexity to your ride and decrease the potential benefits of shared/common components associated with a group.
Additionally, 29ers are horrible for the environment. Sound a bit extreme? It's not. When Gary Fisher, Joe Breeze, and pals decided to use what was available, not only was this the best decision for the need to share common parts on the "Repack Downhill", but it was also the best thing for the environment, at that time and now. Gary and Joe were recycling old bikes and making them more relevant to their specific needs. Simple modifications allowed them to do amazing things back then. To re-create a new wheel/tire diameter would only make things more complicated (less mechanical quality) and reduce the amount of material that was being reused. By changing standards we've only increased the level of complexity and waste associated with the bike industry. If you want to go simple and green: stay with a 26" wheel.
Bike shops are going to financially hurt from the added complexity of another wheel diameter and product type. Nowadays, with multiple tire, wheel, and tube diameters, we've ensured that bike companies have to make and carry a greater level of inventory of stock, at least twice as much, but more than likely it has some exponential effects. These effects would be seen in the multitude of different bikes available in not just pure 26" or 29" wheel sets, but also combinations of wheel diameters like 29/26. Sound crazy? It is, especially now that China has to make more bikes, tires and tubes. As magazines advertise and market these new products, how many perfectly good 26" bikes will end up in the landfill because of the limited benefit associated with riding a wheel that is 3" taller than the previous standard. And ultimately, bike shops will bear the cost of maintaining increased inventory of parts and bike products associated with the bike manufactures' decision to complicate the bicycle market.
Again, this has negative economic, environmental and ride qualities for all cyclists. Protest the 29er!
Well, I rode the single speed cargo bike down to Trader Joe's for the first operational test ride, and all went well. I was able to carry about 47 pounds of food back from Trader Joe's without incident.
My ride is about 2 miles down to the local train station, a short train ride to the shopping center, and about a half mile ride to Trader Joes. Pretty easy ride, with only one major hill to climb on the way back. As such, I was able to handle the increased weight. While the increased weight on the back of the bike was noticable, it was managable riding it home. The bike rack and the ulock securing the bike to the rack held the bike firmly upright as I loaded the cargo container with the grocery bags. Of greater concern is handling the bike after loading it but prior to riding it: It was difficult to handle the bike while unlocking it from the bike rack, manuever it toward the street, etc. The weight on the back made the front very light and relatively unstable side to side, and made me worry that the bike might tip while I was pushing it the short distance from the bike rack to the street. It was a pain balancing the bike while stowing the bike lock in my bag, as the loaded and heavy bike would have created a mess had it tipped at this vulnerable moment. Luckily, nothing did!
Once on the bike, though, it rode well. The cargo container held up, buldging a bit at the bottom, however it suffered no strain great enough to cause white stress marks in the plastic that would indicate potential failure. The bungee cord I used on the top helped hold the lid on, too. The container (Rubbermaid Roughneck) was strong enough to keep the groceries secure and upright. The two bags fit tight enough in the container to keep everything in place without shifting or moving too much.
Overall the system worked well. I look forward to using it on future shopping trips, and would recommend the modification to anyone else that is looking to make their bicycle more practical for short trips. It was easy to manufacture, easy to install, and best of all: easy to remove and place on another bike that has a rear rack mount.
This awesome cargo bike features enough storage space to carry about 4 years worth of groceries, or alternatively, the cyclist could transport a small family (less than 5). I really like the vents (ie air brakes), too.
Well, today was my first day to use the cargo bike for an actual chore. I am an avid re-cycler, in that I enjoy riding my bike over and over again, as well as the other meaning: reducing the amount of garbage my household creates. I have usually accomplished the task of dropping off paper, plastic, cardboard, and metal cans by driving my car about a mile to the local blue recycling dumpsters. I have never liked driving there, as it is just such a waste of gas and is bad for the environment. Supposedly most of the harmful stuff that comes out of your car's tailpipe is emitted in the first couple miles. Additionally short trips reduce your MPG and increase the wear-and-tear on your car because it never has an opportunity to warm up. As such, I have been thinking of ways to eliminate the need to drive to accomplish this weekly chore to benefit the planet, my wallet, and my well being (bikes are good for you...). Well, today, I did!
I took my first operational test drive with two paper bags full of cans/bottles/plastics to the dumpsters a mile away. As I was loading the bags into the 18 gallon Rubbermaid container, they were full enough to put upward pressure on the lid. This made me worry about the lid popping off at speed, so I grabbed a bungee cord and secured the lid. Better safe than sorry, right!
The ride to and from was great. The added weight of the material in the container was felt, but it was controllable. The container, deck, rack, and all the recyclables in the back felt secure. It was a great ride, I may have made the short trip a bit faster (and definitely cheaper) than if I took my car.
So, the cargo bike passed its first test with flying colors. However, I still had a large amount of cardboard to carry, as well as some paper. I took off the lid to the container, filled the container with cardboard, placed a box on top of the full container, and strapped it all down with three bungee cords. I used two bungee cords along the container's width, and one along its length. Even without the container's lid, the load felt secure, but I still had more to carry. I decided to take out the Burley Solo child trailer, and found that a larger plastic container that I had been using to carry recyclables in my car fit in it almost perfectly. I laid the kid's seat down, opening up the interior space, and removed the cloth top to the trailer. I loaded up the large plastic container, placed it into the child trailer, and prepared for a quick test ride.
I rode the fully loaded cargo bike and trailer around in my front yard. While everything felt pretty secure, an item flew out of the trailer, even at the slow pace I was riding in the grass. As such, I attached a bungee diagonally across the plastic container in the trailer, and made sure everything was secure.
I grabbed my bike helmet, and headed off for another bicycling recycling adventure! The ride was uneventful. The slight uphill grade to the recycling bins was more noticeable on the single-speed cargo bike. While my bike and trailer were stuffed with recyclables, it wasn't all that heavy. As such, the biggest limitation to the cargo bike may be its lack of gearing to make hills and loads more manageable. Or it might force me to get stronger! And while it took me two trips on bike, it gave me a great excuse to get out of the house and cruise the neighborhood on my bike. Either way, it was a fun ride, and everything made it to the blue bins without delay. I look forward to recycling again via bicycle.
I've had a single speed for the last six months, a bike that's been cobbled together from used parts and a frame that was left over from a commuter bike that was run over by a car. The simplicity of my single speed has made it a blast to ride, this includes the obvious lack of shifting to worry about, but also the single rear brake. I have been using the single speed for local runs to the store and library, and I've been looking for ways to make it more capable.
I started researching cargo bikes a few months ago, and found that most of them were using either pannier bags or only a milk carton attached to the rear rack. Panniers and small uncovered plastic containers do not tend to provide much hauling capacity, and they also provide very little protection from the weather. Other cargo conversions I have seen include the use of a bike trailer to carry stuff behind the bike. Most of the trailers I researched were converted child trailers, and provided a decent amount of storage capacity, while some of the custom bike trailers were extremely large, capable of carrying oversized cargo that usually entails a pickup truck. While the trailer option would keep the bike unmodified, it would dramatically increase the overall length of the system, which would restrict me from using it on the local commuter train. I have noticed as of lately that bike manufacturers are introducing long wheelbase cargo bikes that provide cargo carrying capacity behind the rider. I have found that the cost for such a specialized bike is rather restrictive, usually starting at 800 dollars, and that the cargo containers provided with these cargo bikes are usually only large panniers that do not provide the best means of carrying or protecting items from the weather.
I was riding my single speed to the store one day, and got to thinking that I could modify it to carry more stuff, maximizing its capacity, while providing me with a 'cargo bike' for no additional money (money that would be spent on a trailer, long wheel base cargo bike, etc). And a dollar saved is two dollars earned, right! Anyway, I had an unused Rubbermaid 18 gallon plastic storage bin in my basement. I tested it and found that it could hold two grocery bags, which is half of what a $2000 cargo bike was holding in a recent bike magazine photo. If I could find a way to mount that container, I could carry half the load of an expensive cargo bike, for free! I also liked the container because, unlike panniers or any of the other systems I have seen thus far, it featured a sealing lid and sturdy walls, both of which would support the internal cargo and protect it from the elements.
I mounted a rear bike rack that was collecting dust in my workshop on to the back of the single speed. With the single speed still in the repair stand, I took the empty 18 gallon container and balanced it on the rear rack, getting an idea of how far back it would have to be to fit behind the seat. I experimented with the placement, turning the rectangular container 90 degrees to determine the best fit. I decided to install the container on the rack perpendicular to the bike to reduce the length of the bike, and the torque that the container (and the weight of the items in it) would have on the bike rack. As such, the container increases the with of the bike, but it will make for a more robust mounting and should be more durable in the long run.
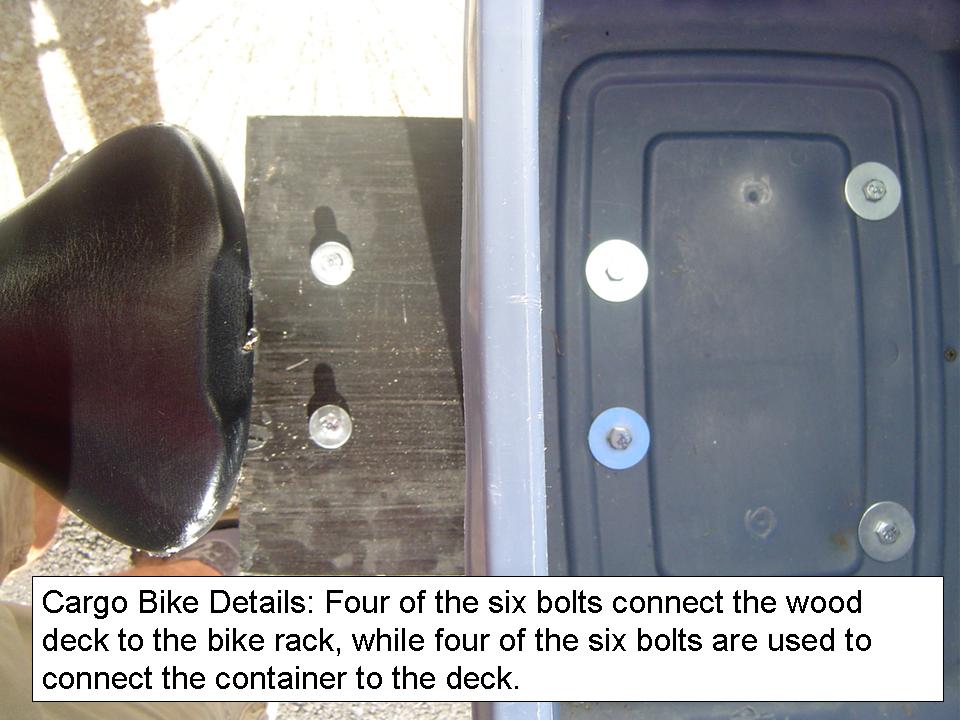
The bike rack was too short, though, to provide a direct mounting of the container to the rack, so I opted to use a 12 inch wide piece of pine board to lengthen the bike rack's deck. I measured the required length, cut a piece of wood from remaining stock, painted it black, and mounted the new wood deck to the front of the bike rack with two bolts. I only used two bolts on the front of the deck and rack, because the remaining bolts would join the container, deck, and bike rack. I drilled four holes in the container and deck, and bolted the container to the deck and rack. After a test fitting, I removed the container from the deck and bike rack, applied Liquid Nails to the deck where the container would mount, and repositioned the container and bolted the container onto the deck.
Flight test! After waiting a night to allow the industrial glue to dry, I rode the bike around the block to see and feel how the container and rack felt. I didn't notice anything out of the ordinary, and everything felt sturdy, so I decided to load it up! I filled two cloth Trader Joe's bags with frozen veggies from our freezer. I lugged the test load outside, and placed them into the 18 gallon container. The container held the large bags very well, with the lid sealing them from the elements and providing additional strength to the container. I noticed the weight of the load and its effects on the once light and simple single speed bike as I began to move and mount the bike. However, as I pushed on the pedal and developed some momentum, the bike handled very well. The rear brake was still adequate for stopping my single speed cargo rig, and the few small bumps I hit didn't jar the load, container, or anything holding it all together. First test run was a success!
I will ride it to the Target store down the street and Trader Joe's which is just a short bike and train ride from my home. I may make some additional modifications, as needed, however the system is working so far. I anticipate that I may need to use more bolts to ensure that the container remains connected to the deck, but I also know that drilling additional holes in the bottom of the container reduce its strength and durability. There is a happy medium, and I will probably work toward it slowly.
More to follow as actual cargo carrying trips take place!...
The Cannondale Prophet is an all-mountain full suspension bike. It’s designed to be versatile, and as such it is capable of handling just about anything thrown at it. Its geometry, specifically the placement of the rear suspension pivot, ensure that it climbs well without ‘bobbing’, as well as providing a plush ride on the descent seated or on the pedals.
As with all other Cannondale frames, the Prophet 800 is made by hand from Aluminum at Cannondale’s Bedford, PA factory. The frame quality is excellent, with finished welds, and production and engineering methods to ensure light weight and strength.
The Prophet 800 came well equipped with Lefty Max TPC front suspension, Manitou Radium rear shock, and a mix of Shimano XT and LX components. The Lefty Max performs well. The internal roller bearings provide a supple feel not possible in other forks, and also reduce the need for maintenance required by other suspension forks that have wearable plastic bushings. Less time in the shop and more time on the trail is always a good thing! The Lefty is definitely and interesting fork to ride, often attracting comments from other riders. The Lefty Max front suspension did not have the lock-out featured in earlier models of the Lefty and other HeadShok suspension products, but it did have a rebound adjustment knob within easy reach on the top of the fork. While the lock-out feature was rarely used in other test bikes, it was a welcome feature, especially for non-technical and paved sections where the stiffer, unsuspended bike provided greater speed.
The rear suspension is active and plush. The cartridge bearings and beefy mounting points ensure lateral stiffness, in which no play was felt or developed during the three year test period. The Manitou rear shock is a simple air spring shock, with limited rebound adjustment. The shock is easy to add or remove air from the spring chamber, providing the rider with an easy means of customizing the ride. As stated earlier, the cartridge bearings and pivot geometry ensure a plush downhill experience that still climbs well, even avoiding any ‘bobbing’.
The part spec is a mixture of XT and LX, along with Cannondale’s Coda brand components. The rear derailleur is mated with LX dual control levers. These dual control levers are initially unusual to ride with, but are surprisingly easy to learn. They were easy to shift while braking, and performed well with Shimano’s rapid rise rear derailleur. I found the Dual Control shifters worked well with the Rapid Rise rear derailleur. Rapid Rise derailleurs have been unpopular in the past because they reversed the shifting order associated with trigger shifters. As such, it was easier to accept the Rapid Rise derailleur because the dual control shifters required the rider to learn a new shifting paradigm. Rapid Rise derailleurs are supposed to provide more reliable shifting performance and the Dual Control shifter’s integrated design keep you in control.
Overall, the bike performs well. The hand made frame is durable and light. The Lefty front suspension held up and performed as advertised, being much smoother and laterally stiffer than conventional forks. The only improvement would be a water bottle cage mount within the frame triangle, and an improved rear shock. The rear shock could provide additional adjustments. The parts included are adequate, especially for the price of this ‘entry’ level model. As individual parts wear out, they could be replaced for higher end types. However, the components have been reliable and have performed well under all conditions.