Wednesday, December 23, 2015

Prophet V 3.0

This September my mountain bike turned ten years old.  I remember the day I bought it, back in September of 2005.  I got it from  Big Shark Bicycles in Saint Louis, MO, and my wife and I would visit the Cannondale factory in Bedford, PA that October.  There we got to see Cannondale mountain, road, and commuter bikes being built by hand in America.  It was an impressive sight to see!  And I was excited to see the facility that created the many Cannondales I've owned over the years.

Since then, Cannondale has been purchased by a global sport conglomerate, and that factory was closed, with the firm opting to move production to Vietnam.  Simultaneously, the bike industry has also seen prices for their products quadruple in the past four years, with some bikes retailing for over ten thousand dollars.  And this is for products that are mass produced in south east Asia. 

I'm bringing all this up, because over the past year or so, I've been thinking about getting a new bike.  However the combination of financial constraints, along with romantic ideas surrounding my existing hand built bike made me strongly reconsider purchasing a new bike.  That is, I'd spend more to get a new bike that was probably "less than" the bike I was currently riding.  But there were features coming on new bikes that I definitely wanted.  Over the course of a few months and a little bit of research, I'd find out that these  features could be purchased for the fraction of a new bike.

The new parts I were interested in including a 1x ("one by") drive train and a dropper seatpost.  The 1x drive trains were an innovation of SRAM.  During a test ride a year ago on a high end mountain bike featuring their XX1 brand drive train I got to see first hand that it provided ratios low enough to climb trails in Steamboat Springs, CO.  I was really looking to change over  to this style of drive train for a few reasons.  One of the reasons was simplicity. 

The removal of the front derailleur would also eliminate the front shifter on the left side of the handlebar, improving through simplification the "user interface".  I noticed even on a demo bike that I was no longer thinking about shifting.  With a 2x or 3x system, you're often thinking about what combinations of gears you should be running between the front chain ring and rear cogs.  I noticed on the demo bike equipped with a 1x drive train that all of that thinking just didn't need to happen.  You shifted up or down on one shifter.  That's it.  Easier user interface and more thought going toward the ride.  Or less thinking!  Either case is a better deal.

With this in mind I started looking into the SRAM 1x drivetrains that were available, but I found them to be overly expensive.  So, I started looking into conversion kits for 2x10 drive trains.  I found the various conversion parts relatively inexpensive, but many of the reviews I read indicated that while the conversion kits appeared to be an inexpensive "stop gap" for getting to 1x, they weren't as good as a true/pure 1x system, as they were stressing some of the components involved, namely the rear derailleur.  On top of this, I would be purchasing new drive train components, and purchasing a conversion kit on top of this added expense and all had the appearance of "bail wire and duct tape" solution to my end goal.

A few months ago, I read of Shimano's new 1x drive trains that were coming available in XTR and eventually XT brands.  As the XT 1x drivetrains were released, I saw that they were pretty inexpensive compared to their SRAM or Shimano 2x drivetrains (+ conversion kit).

I found the XT 1x drivetrain for about $400, and the online retailer allowed me to customize the bundle.  I had been looking at online gear ratio calculators, and with some of the steep climbs on Colorado's front range, I opted for a 30 tooth front ring and a 42 tooth rear cog.  This was as low as the Shimano 1x system offered, and it would provide a similar ratio to the 34 tooth cog and 22 tooth chain ring in the legacy 3x9 drivetrain it would be replacing.

Since my existing drivetrain included Shimano's integrated "Dual Control" shifters/brakes, I would have to get new brakes too.  Dual Control was an innovative idea from Shimano about ten years ago, an idea that didn't quite catch on.  It was the mountain biking version of STI shifting, where the brake levers were moved up or down to shift the bike.  The concept simplified the controls a bit, and I felt it worked well, but I always preferred the separate triggers and brake levers on other hard tail mountain bike.  So, the upgrade on the Prophet would allow me to replace the controls with a more traditional and preferred trigger and brake lever set up.

As I started shopping for brakes, I noticed that Shimano released a new brake to go along with the release of their new drive train.  The M8000 series brake looked great, but I also noticed that it was selling for considerably more than their previous release, the M785 series brake.  I did a bit of research online, and folks were saying that there was minimal (no?) difference in the brakes between M785 and M8000.  Made sense to me, as they probably focused their engineering efforts on the drive train, and adjusted the look of the brake (more black!) to release it simultaneously with the updated drive train.  So, I opted for the older but very similar M785 series brake, and found them from a store online for about 60 dollars less than the M8000 per brake.

Lastly, I shopped around for a dropper seat post.  Unfortunately most of the modern dropper seat posts come in diameters to large for my Cannondale's 27.2 seatpost will allow.  This limited my options to the Gravity Dropper Turbo or Gravity Dropper Classic.  Luckily my research on dropper seat posts found that the most reliable dropper seat post on the market was the Gravity Dropper series of posts.  It turns out that the modern hydraulic actuated dropper seat posts are very easy to use, however they tend to have issues with durability and reliability.  That is, they fail often, and leave their users with the seat post stuck in the lowest position in the middle of a ride.  Meanwhile, the Gravity Dropper post uses a cable, mechanical switch, and spring to actuate the dropper mechanism, all of which provide a more robust solution to a component that's under a lot of stress and strain.  So, I found a great deal on a Gravity Dropper Classic in the 27.2 diameter.

So, with the parts ordered  and waiting for them to come in the mail, I started taking the bike apart, removing all of the legacy drivetrain components.  The bike was essentially stripped down to the frame with the exception of the front fork.  I took the opportunity to thoroughly clean the bike, getting into all the hard to reach places.  I even took the time to put two coats of wax on the bike, improving the paint's sheen a bit.
Bike is stripped down the frame, cleaned up, and even polished!
The parts arrived just before the holidays started to get into full swing, so they had to wait a while on the work bench in their respective boxes, as my time was spent with family.  But as time availed itself, I set to work... first with the brakes.  I mounted the front and rear brakes, noticing that the brake lines were definitely too long and were going to need to be trimmed. 
New brake lever mounted beside the XT 11 speed rear shifter.

New rear brake caliper mounted. 
Next I mounted the new bottom bracket, a Shimano BB70.  I mounted the bottom bracket per the instructions, with most of the spacers on the drive side (I'll talk about this a bit later).  I installed the new cranks, and mounted up the derailleur and rest of the drive train.  Everything mounted easily.  It took a bit of figuring out on how much chain to remove for the proper set up.  That 42 tooth cog takes up a lot of chain!  I ended up removing three links from the original 116 link XT chain. 

New crank mounted. 
One by!  Very clean up front without the front derailleur. 
New XT cog set on my wheel.  That 42 tooth cog is huge!  Pie plate!

Lastly, I mounted the dropper post.  I ran the cable for the dropper post along the top tube, and secured it with some black mini zip ties.  I've heard some folks bemoan the lack of internal routing for the Gravity Dropper post, but I like that I'll be able to maintain the cable with very little fuss. 

The Gravity Dropper seat post mounted. 
With everything installed, it was time to tweak and adjust everything and getting it working in unison.  One of the first things I noticed with the new 1x drivetrain was the extreme chain line angles that resulted from the chain moving along 11 rear cogs and remaining on the same chain ring.  I had installed the bottom bracket, with all the necessary spacers, per instructions, however the instructions predated 1x drivetrains.  Clearly the 1x drivetrain is designed to run more extreme angles than a 2x or 3x drivetrain, but I wanted to be sure the chain line was straight in the middle of the cog set, and not too extreme on the highest or lowest gear.  So, I removed the bottom bracket, and balanced the spacers between drive and non-drive side.  By balancing out the spacers, I effectively move the chain ring and drive side crank closer to the frame, and in so doing, reduced the extreme angle I was noticing when the chain was on the largest cog.

Checking the chain line.  The 1x drivetrain can create some extreme angles for the chain!
Next, I trimmed the brake lines and bled the brakes.  The brake lines were a few inches too long for my particular bike, so I trimmed them back.  I also took this opportunity to route the rear brake line between my front fork and frame, which wasn't possible as this space is too small to fit either the caliper or the lever.  So, with the lines trimmed and reinstalled, I re-filled the brakes with Shimano mineral oil and bled them, giving them a nice positive feel. 

Lastly, with the bike on the floor, I adjusted the angle of the levers, ensuring a comfortable 45 degree angle as well as adequate spacing between the levers and grips.  I like a nice "moto feel", with ample space between the grips and levers.  I also adjusted the location of the dropper seatpost trigger and shifter trigger to ensure they moved freely and were in a comfortable location. 
New brake lever beside the trigger for the dropper post. 

And now, for a test ride.  Unfortunately, the front range has been hit with plenty of snow, which makes for great skiing...  as well as the need for some terrific patience, waiting for drier weather to run this new/old bike for the first time! 

Upgrade to V3.0 completed! 

Upgrade to V3.0 completed! 


Monday, October 15, 2012

Gear: Upgrading the Shop, Il Grotto di Volpe v2.0!

Well, I got a new job, and with it a new house!  Figures: just when you get everything dialed in your house...it's time to move.  So, we moved to Denver, Colorado, which will provide wonderful recreational opportunities on the bikes and on the skis.

First things first: get the shop in order!

The prior owner (original owner) hadn't done much to the house, and this included the unfinished basement.  There was a rudimentary work bench-thingy, but was very inadequate  as it wasn't properly built, and wouldn't withstand any of the forces that come with a work bench, nor was it optimized for storage.  So, I looked online for a suitable plan.  In Saint Louis, I had a prior existing steel framed workbench from which to improve upon; in Denver I'd be starting from scratch.

Panoramic shot of the workshop space before...

Panoramic shot of the workshop after...
I found a design online that inspired my workbench.  It was to be a basic frame, mounted to the concrete basement walls.  The online plans called for a monstrous 16' workbench...and I decided that based upon the material and the space I was building to, I'd simplify it to 8' wide. The original plans that inspired my workbench are here.

Frame for the workbench complete...
So, to avoid any joints in the actual work surface, and to ensure the bench didn't take up too much space, I kept the length at 8'.  I built the worksurface frame, mounted it to the concrete foundation/wall, and attached a couple legs on the front.

The workbench frame mounted to the concrete foundation...
Next, I built a 8' long shelf frame, that fit within the legs supporting the actual workbench.  The upper workbench is 24" deep, with the shelf underneath 21" to fit between the wall/foundation and the legs.  Both frames are mounted to the wall using concrete mounting bolts.  It was fun to get the hammer drill out, the tool necessary to drill the mounting holes in the foundation wall.  :)

Frame for the lower shelf complete...
After building the frame, I took a moment to install adequate electrical plugs behind the workbench.  I "daisy-chained" five plugs together, ensuring more than enough power for the workbench tools, chargers, and anything else I might need to plug in.

Electrical outlets installed behind the workbench...
Following the successful installation of the electrical outlets, I mounted a 4x8 particle board on the wall immediately behind the bench.  I like a full piece of wood rather than drywall, making any installation of mounting hardware or peg board much easier.  I painted it white, too!  I also cut and mounted my plywood work surfaces to both the bench and the lower shelf.  I bought a more expensive hard wood plywood, ensuring the surface would be durable.  

Plywood worksurfaces installed, caster mounted drawers completed,
and particle board installed behind workbench...
Lastly, I built the caster mounted drawers.  The original design called for the sides to be made from 1x6s, however the previous versions I made in Saint Louis were quite a bit taller, so I opted for a slightly larger wood stock: 1x8.  I found that the drawers I built in Saint Louis were a bit too deep, however as I measured my tools and other items that would be in these drawers, I figued the additional two inches of board width would help make a slightly deeper, and hence slightly more practical drawer.  These caster mounted drawers are perfect for storing those large, heavy tools like hammer drills, circular saws, and anything else you want to get out of the way.  Also, take note, that I had mounted the shelf slightly higher than the plans called for to ensure there was enough room for a taller/larger drawer below it.

Workbench and adjacent work areas, including miter saw and bike repair stand


The completed workbench!  Peg board mounted, and tools organized (for the most part).  Fun, practical project.

Workbench completed!  


Bikes: Ultimate Commuter! ...Cannondale Bad Boy

I purchased this bike in fall of 2009.  I originally purchased it in Italy to replace my cyclocross road bike.  I lived atop a mountain (literally) there, and finishing each ride going up my 45 degree drive way was punishing.  So, I thought a bike like this would make it easier to climb.  Especially with a child on the back.  I put a European child seat on the bike, a design I haven't seen available in the US, that allows the seat to be removed with the touch of a button.  So, this bike made it possible to grind up the long hills, a feat I was unable to accomplish on the higher geared road bike.

Turns out this bike is great for commuting, too.  I love it!  We just moved to Colorado, but while we were living in Saint Louis for six months I enjoyed commuting 6 miles each way to work on this bike.  It's great for commuting!  ...in fact, considering that I've been bike commuting regularly for over ten years, I should have bought one sooner!  Instead, I had been riding older, used bikes.  As you'd imagine, I end up spending more time and miles on the commuter bike than my fancy and expensive mountain bikes.  So why did I ride, old, worn out, crappy commuter bikes, bikes I typically rode more often and further than my new, light, and wonderfully functional "recreational" bikes?  I can't answer that, but I did alleviate it!  I bought a Cannondale Bad Boy.

What makes this bike so terrific for commuting?  It's the mixture of mountain and road bike parts...  The frame and drivetrain are from a mountain bike, ensuring the bike is relatively relaxed to ride, and it can easily climb any hill.  The disc brakes offer great stopping power in all conditions.  Oh, don't forget the front suspension, also from it's mountain bike "roots".  You can turn the suspension on or off with the flick of a switch.  Having the ridged fork is great for speed, but when you want to smooth out a rough street, just turn the switch, and you get to enjoy the benefits of suspension.  Meanwhile, the road wheels make this bike incredibly fast!  They're taller, and slimmer...ensuring less rolling resistance.  I've  installed Michelin's Pilot Sport tires, with the Protek HD, to provide better traction on wet roads.  This was key for safety and performance in Italy, where I found the roads to be very slick with even a bit of dew, let alone rain.  So, these tires provided the appropriate traction in a country where they put slick marble in the asphalt!
 
I love this bike, and I look forward to commuting to work in Denver!

Wednesday, May 9, 2012

Spare Parts: How the Local Bike Shop saved the day, time, and money

The culprit
Interesting that I had been looking for a part, and I just couldn't seem to find one for my bike through all the usual means.  See, my rear derailleur broke, a little wheel, referred to as a "pulley" had cracked, ensuring the chain would not effortlessly weave through the device that alternates the gear ratio on my bike.  So, I needed a replacement pulley.  I didn't need anything fancy, and I didn't want to spend too much.  I looked online first to see what kind of parts were available.  I found Pulleys for as much as $130 a pair!  Wow!  Why, you might ask?  I guess because they're ceramic, but probably because someone would be willing to spend so much (a Ben Franklin burning in their pocket, I guess).

Anyway, I found a nice pair of pulleys online for about 20 bucks.  ...But come to findout they were out of stock.  This is a simple part, and I was rather frustrated that the shipping process alone would slow this down a few days, so I wasn't about to wait for some online retailer to stock the thing.  Frustrated, I went down to one of my local bike shops, a rather high end retailer of bikes in the city.  I was doing some errands, so it was easy to drop by and see if they could help out.  No joy.  Turns out they were lacking in Pulleys, too.  Global shortage of derailleur parts?!?  Don't know, but I was kind of frustrated.  Not at the employee, just that it was proving difficult to get a relatively simple machine (my bicycle) running because one lousy pulley was broken and no one seemed to carry a inexpensive replacement.  I guess the bike shops have a hard enough time keeping up with all the non-standard items the bike industry keeps throwing at them: kind of hard to maintain a stock for every part for 29", 26", and 650b wheels, along with 10, 9, 8, and 7 speed drive trains, not to mention mountain, road and many other "styles" of bikes.  So much for keeping it simple.

So yesterday, while on the way home from work, I decided to drop by another bike shop.  I've bought from this shop from time to time, and truth be told, the service that this guy does is bar none.  Top notch.  I figured if anyone was going to have this part, A&M Cycles would.  So, I  cruised on over, talked to Karl, who introduced me to his excess derailleur bin.  I found all sorts of derailleurs, of different makes and different eras.  And low and behold, I found a Shimano 105 derailleur that had been stripped of the other pulley.  So, I was completing the robbery!  I unbolted the other pulley, tossed it in my bag, gave Karl five bucks for him saving the day (which he promised to use on a cold beverage), and headed home.

Thanks to a small, not so glamorous business, I was up and running in no time, and for little money.  If there's a moral to my little experience, it's something about recycling old parts rather than buying fancy new stuff, and more importantly, helping the local guy who helps you.

Saturday, April 28, 2012

Gear: Upgrading the Shop, Il Grotto di Volpe! (Fox Cave!)

With the move back to the States from Italy, we were looking forward to moving back into our house.  Granted, we knew there would be some work associated with cleaning up after the renters, but we also knew that our "fresh start" would also provide an opporunity to work on some things around the house that we never had the opportunity to improve when we were actually living there.  For example, we had talked for years about refinishing the hard wood floors, however this is a daunting task when you actually occupy your house.  What are you going to do, move everything to one side of the house, sand and stain the floors, move everything to the refinished side, and repeat?  Sounded messy and like a lot of work, so as you can expect, it never materialized.  Well, with all of our stuff still in transit and the house empty (sans tenants), we took the grand opportunity to refinish all the floors.  Still quite a mess, however it's a lot easier cleaning up just a few ceiling fans and window sills compared to EVERY ITEM in the house!

So, with this wonderful opportunity to improve some stuff in the house, we decided to also have the basement repainted.  The basement is of the stone variety, without the smooth, dry walls of a poored concrete basement.  Over time mold and mildew had formed on the stone walls, so it was really in need of some Dry Lock paint.  Dry Lock is a special paint that seals up concrete and masonry walls, preventing moisture from seeping in, and also gives a nice clean appearance, as it's a new paint job!  So, with the basement getting a new coat of paint on all the walls and on the floor, I had to gut the workshop...which provided not only an opportunity to get a coat of paint on the walls, but also to rearrange and reorganize how the workshop is layed out.  My workshop was going to get a makeover!

The workshop: Before (Nasty Walls!)

The obvious first step was clearing out all the old cabinets, workbenches, and other items that had collected in the basement.  I was really surprised at the amount of storage I had in the basement, most of which was old kitchen cabinets.  I tore everything out and moved them out to the garage.  With the basement completely empty, the work crew that was also rehabbing our bathroom got to work cleaning and painting the floors and walls of the basement.

Workshop: Before (Too many cabinets!)

Once they were done, the basement looked like new!  Amazing what a new coat of white paint on a wall will do!  The floors were all a nice light gray.  With a nice blank canvas, I started by bringing the workbench and the best couple cabinets back into the shop.  One of the primary issues I was having with the previous version of the shop wasn't just the poor quality of cabinets, but also the amount of cabinets.  I had too much storage space, and too much counter space, to the extent that I was probably storing things that were better off thrown away.  And many of my larger power tools were difficult to get in the cabinets that weren't designed to hold large, heavy electrical tools.  With all that in mind, I decided that less was more.  I only brought down one cabinet to be permenantly installed in the shop, another cabinet to be mounted on casters as a sort of mobile work stand, and plans for improving the workbench to improve it's storage capacity.

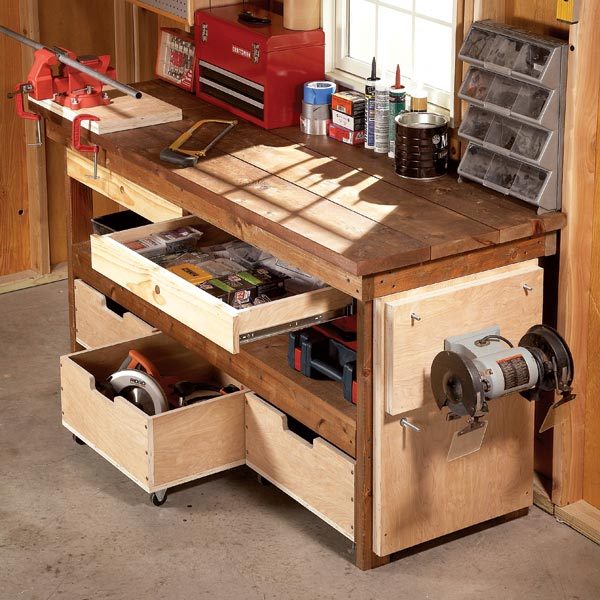
The work bench had been just a thick piece of wood mounted on a sturdy steel frame, with under bench storage consisting of setting stuff on the floor or on the one rickety shelf (that consisted of a couple old boards).  While searching for ideas online (gotta love Google's Image Search!), I found some plans on a woodworking sight for sprucing up a work bench.  What immediately caught my eye was the large drawers mounted beneath the work surface, and the large caster mounted boxes designed to roll on the floor and act as heavy duty drawers to store power tools.

Here's the inspirational photo, from: 
http://www.familyhandyman.com/DIY-Projects/Woodworking/Workbenches/diy-workbench-upgrades/Step-By-Step
So, with an improved workbench in mind, I installed fewer cabinets to make my workshop better.  Almost immediately I noticed that the increased space allowed me to more easily work on projects.  And one of the first projects was improving the workbench.  I cut plywood for the drawers, making them as wide and as long as possible, to maximize storage space for items I'd use a lot, like drill bits, screws and other small hardware.  I kept them fairly shallow, so that they'd remain well organized and not turn into junk drawers.  As for the caster mounted "drawers" that were to roll on the floor, I made them deep enough to allow tool cases to fit securely in them, and long and wide enough to maximize the space under the workbench.  Overall, the four drawers effectively store most of my tools and their accessories.

The improved bench with large drawers mounted below the work surface and two caster mounted boxes (drawers) that roll on the floor and are great for storing large, heavy power tools.  
Closeup of the caster-mounted drawer.

With the workbench project complete, I moved some track lighting above the corner where I planned on setting up the bike rack, ensuring enough light while working on the bikes.  I mounted the one cabinet to the left of the bench, and another smaller cabinet above it, for holding small items and stuff I wanted to keep out of the kids reach, like paints and spray lubricants.  I painted some peg board black, figuring it would offset nice with the new white walls, and also highlight the tools on the board well.

Before
After

On the far side of the shop I installed a double-decker bike rack to hold two bikes, and next to that I installed a wood shelf system from IKEA.  This area had previously held one cabinet that was used to store painting supplies.  The corner wasn't necessarily a mess, but the corner wasn't really "used" in the sense that the stuff stored there was rarely used.  It was kind of a "permanent paint storage" after the wife and I painted.  Storing the paint in the garage freed up the space, ensuring that the new shelves and the bike rack would allow easy access to tools and supplies that were used more often.  My wife described this corner's improvement as looking "less scary".

The "scary" corner, before...
...and After: now with the double-decker bike rack and ample storage thanks to a shelf system from IKEA.
Kitty Corner from the bike repair stand, I cleaned out the area around the work sink, which had previously held floor and wall mounted cabinets to the left of the sink and to the right of the sink a table that held a miter saw.  The previous configuration provided too much storage space, and took up too much of the room.  The saw produced a lot of dust in the basement, so after the basement was painted, I decided to not replace any of the cabinets permanently along this wall, and to keep the miter saw in the garage.  To provide some storage and a more flexible workspace, I built a mobile workstand out of two of the smaller cabinets.  I took two cabinets, one base cabinet and one drawer base cabinet, screwed them together, flipped them upside down and mounted 3/4" plywood base on the bottom.  On the base I mounted four brake equipped casters.  I flipped the now mobile cabinets back over, upright, and screwed 3/4" plywood on the top for a workspace.

I built a duplicate to remain in the garage, which is separated from the house, to hold the miter saw that will spend most of its time out there.  To provide some flexibility with where the miter saw operates, I mounted it on plywood, and drilled a hole in each of the four corners.  I used these holes as guides, drilling matching holes in both of the mobile workbenches, one in the garage and one in the basement shop.  I removed the plywood mounted miter saw, set it on it's side, and glued dowels into the holes, with the dowels facing down, like spikes.  These "spikes" or dowels fit into the mobile workbench and ensure a secure and consistent fit.  

So, eliminating the excess cabinets proved more space for working, and an opportunity to build a more flexible storage and working platform.

Standing by the bike repair stand, looking back: more peg board to hold paint brushes and helmets, work sink, and caster mounted work bench.
I had recently upgraded to a new laptop.  Faster, more storage, all that...  But the old laptop still worked fine, so I thought I might re-purpose it for use in the shop.  Why, you might ask?  Well, for a couple shop specific "tasks".  First, music.  The hard drive on this laptop can hold more than enough music, and with the growing number of songs on YouTube, a WiFi enabled laptop could allow me to enjoy "music videos" while I'm working.  My playlists on YouTube are free, and there's nearly endless variety.   Not to mention Pandora, or many other web based music services.

The second important aspect of making a laptop computer an integral part of the shop is the tremendous number of "How-To"s available on the internet.  From PDFs that explain the intricate details of a suspension fork, to YouTube videos that go step-by-step through the complicated process of bleeding air bubbles from your hydraulic brakes, the notion of having a "shop computer" is priceless.  I had been bringing my nicer laptop into the shop while working on various projects, but I was always worried about getting it dirty or worse broken.  Well, I wanted to repurpose this old laptop so that I wouldn't have to worry about either of those issues.

I thought about building a slide out drawer like device to house the laptop, and while it would have been awesome to have that "disappear" under the work bench, it posed a number of issues.  The laptop would be more permanently affixed to the drawer, reducing the flexibility of having a more portable laptop in the shop.  Which leads to the next issue: where would I mount the drawer mounted laptop?  I would want it accessible so that I could view diagrams while working on the bike, or any other work surface.  As I thought about the practical issues of using a computer in the workshop, I decided on a more mobile solution, and one that would be easier to construct, too.

I built an angled mount for the computer.  It puts the laptop at a 25-30 degree angle, making it easier to type while working, and also shortening the depth of the computer, too, which ensures it takes up less of a footprint on the workbench.  I drilled some holes in the plywood surface that is the mount, to ensure that the computer gets some airflow.  Next, I painted the laptop mount.  Finally, I mounted the laptop's old power cord adapter underneath along with a set of USB speakers.  The entire unit now sits on the workbench, right next to the toolbox, which says a lot about how the rapid access to information improves the ability to fix and maintain just about anything.

The new and improved shop looks cleaner, has better lighting, but features less storage space than its predecessor, which I believe is a better space for actually working on projects.

Completed Shop: improved workbench, laptop computer mount, track lighting above the bike repair stand, with the Fox symbol as the finishing touch!    

Monday, April 16, 2012

Prophet Upgrade Project: Phase II

Well, after returning from Italy, and with a good three years of hard riding on the bike, it was definitely in need of some TLC.  The bike was really in need of two major upgrades or repairs: new rims and an overhaul for the fork.

I had done some research regarding the Prophet's Lefty fork, and I discovered that the TPC Max fork that came equipped with my 2005 Prophet could be upgraded to "PBR" (Progressive Bend Radius...whatever that means?!?).  What a PBR upgrade equated to me was upgrading the fork's spring from an actual "spring" to an air spring, which is more fine-tunable.  Also, most importantly, the PBR upgrade would provide me with a lockout feature on the front fork.  This is a feature I had on my previous mountain bike, a 2001 Jekyll, and it was a feature I rather enjoyed.  It was nice to lock out the fork on climbs or on pavement.  It was surprisingly useful, so it was a feature I was looking forward to getting on my "new" fork.

Top of the new/improved Lefty Fork, showing off the PBR controls.  The blue "Poptop"  activates the lockout and also exposes more of the red Rebound Adjustment knob that surrounds the "poptop".  Pushing the red Rebound knob down reactivates the fork.  Easy!  

As it turned out, much of the maintenance on Cannondale's Headshok forks is now accomplished at the Cannondale factory.  However, my research on the potential for fixing and upgrading my fork also uncovered a small New York based bike shop that specializes in fixing and upgrading Cannondale Headshok suspension systems.  Mendon Cyclesmith is the shop,and Craig is owner, operator, and Headshok expert.  So, I just removed the Headshok Lefty from my Prophet, stuffed it one of the many post-move-from-Italy boxes I had lying around, and shipped it off to NY.  To my pleasant surprise, Craig had it back to me in about a week!  Very fast service.  And the fork feels like new.  It's like butter!  And the added lockout feature is great.  There's a small "pop-top" button to hit, and that's it.  The fork is locked out.  The "pop-top" button releases the compression dampening adjustment knob that is beneath it.  To reactivate the fork, I simply pushing the larger compression dampening knob back down.  Piece of cake!  Actually easier to use than the previous Jekyll's method, which was a dial or switch on the top that had to be turned about a quarter turn to activate/deactivate the fork.  So, this option is battery free and easier than the old switch.  And it looks great, too.

Craig also re-greased everything, and got all the fairly complicated details of the Headshok in perfect working order.  As I said earlier, the fork feels like new, and considering how inexpensive it was for him to service it and upgrade it, I will be getting it service regularly by him, which he and Cannondale recommends to be once a year.

The second upgrade was new wheels!  Well, sort of...  Like the fork, I actually saved most of the wheels, or the most important part, the hubs, and had my local bike shop lace up a new set of rims.  I had been considering a whole new set of wheels, in fact I had started to settle on a sweet set of Mavic wheels.  But rather than go all out and get a new set of Mavics, I figured I spend half as much and get a great set of custom built wheels.  I brought the old wheels, which had slightly bent rims and spokes (did I mention they were well worn?!) and asked to get some Mavic XM819s laced onto the existing hubs.  The next day I received a call from the shop, and was told the XM819s would not be compatible, so they gave me a couple other options to consider.  I took those options to the "internets", and decided upon the "Stan's No Tubes ZTR Arch EX".  Wow. That's a mouthful!  My local bike shop, Big Shark, built them up, and I have to say, they look great!  I have not had the opportunity to give them a proper ride yet, but the test flights in the neighborhood were all successful.

Beautiful new wheels.

So, the Prophet is all set for a new set of adventures in Missouri and where ever else I may find myself!  Happy Trails!

...and a video demonstrating the Cannondale Lefty with PBR upgrade:

Sunday, October 16, 2011

Trails: Ischia


This summer I had the pleasure of riding over on the Isle of Ischia twice.  The route, pictured below, is just over 36 km long, and puts you through 1091m of climbing with a maximum altitude of 772m.  Needless to say, it's quite the ride, and while the distance and climbing may be grueling, the vistas along the way are breathtaking!  The climb is mostly road to the top, with plenty of places to stop for breaks and to pick up additional food and water.  At the top, you descend on some of the best single track I've ridden in Europe, swooping down along the ancient volcano, finally reaching Porto Ischia for mandatory carb-loading (read: German beer and Italian pizza).  Ischia attracts many German tourists, and as such, the beer selection on the Isle is typically better than on the nearby mainland city of Napoli.  


The route: 36km, 1091m of climbing! 
I live on the mainland, in the small town of Monte di Procida, which features a small port were small ferries operate during the summer.  The ferries are only large enough for passengers, and take foot bound traffic (and bicycles) over to the nearby isles of Procida and Ischia.  Unlike the larger car ferries that operate out of Pozzuoli and Napoli, these little pedestrian ferries move a lot quicker.  Typical travel time on a ferry out of Pozzuoli to Ischia is about an hour.  The ferry from Monte di Procida to Ischia is just 20 minutes!  Not only are these ferries from my hometown faster, but they also save me from the additional trip via train or car to Napoli or Pozzuoli.  Added bonus!  So, for the first ride of the summer over to Ischia, my friend, Rich, and I met up at my house early that morning, did some last minute maintenance on the bikes, and rolled down the hill to the port.  Once at the port, we bought our roundtrip tickets and waited for a few minutes for the ferry to arrive.  After about 10 minutes, the ferry pulled up, we rolled the bikes over "the hook" and got settled up on the bow of the boat for the short trip to Ischia.
Rich checking out the view from the top deck of the ferry.  Ischia far off in the distance (center), with the smaller isle of Procida just off port side (left).  
Our two bikes safely stowed on the back of the ferry.  
The ferry pulls into Porto Ischia, a small port town on the north eastern side of Ischia that is overrun with tourists from all over Europe.  Taxis and buses rush them off to other parts of the isle, as most tourists are there for the wonderful beaches and volcanic hot springs.  We begin our journey by starting a short climb out of Porto Ischia to the west toward Forio.  On the way toward Forio, we pass through Casimicciola Terme and Lacco Ameno.  There are a number of shops in both of these towns, most of them selling typical tourist fare, however these are great places to pick up some fruit and water for the ride.  And if you like super yachts, this is the place to see them.  With all the British flagged vessels, you think all of London's financial district takes vacation here.  I feel lucky that I can enjoy this island with just a short ferry ride! 
Looking back toward Lacco Ameno.  My yacht is parked
 After we ride through Lacco Ameno, we begin the ascent over the small hill that separates Lacco Ameno and Forio, further to the south.  The hill provides wonderful vistas of Lacco Ameno and Forio, and our route between the two towns is along the dramatic (steep!) coastline.  The Mediterranean is beautiful from up there! 
Looking south toward Forio
The road that leads into Forio along our route became cobblestone covered and twisted back and forth, even going through an arch at one point.  Some of the best urban "trail" riding I've experienced!  Once down in the town of Forio, we rode along the road that parallels the beach.  We stopped for a quick break at a local fruit stand, where I enjoyed a fresh nectarine.  Sure beats a Power Bar!  We continued through Forio, taking another moment to enjoy the vista from the Church of Soccorso.  We rode down a steep staircase, to the road below, and continue along the beach, until we reached the base of Monte Epomeo.  The next couple hours would be spent climbing  to the top of this ancient volcano!  (ugh!).  

We maintained a good pace on the way up, taking breaks whenever the need arose.  The heat and humidity added to the challenge, however we were well prepared.  I alone was carrying two liters of water in my Camelbak, with an additional water bottle full of Gatorade.  
House atop a large volcanic boulder, with a surrounding vineyard. 
The road we follow toward the top of Monte Epomeo provides some wonderful views, which help keep your mind off the heat and the climb.  Vineyards, fruit trees, and small villages line the route, with expansive views of the Mediterranean below.  
View of the Mediterranean as we ride along...
Almost at Fontana, looking back at our route and Panza in the distance.
We continue to climb along the road, until we reach Fontana, where we take a short lunch break.  We also buy some more water at Fontana, because the remainder of the route is away from civilization and off road.  At this point in the ride, I've already drank all two liters of water in my Camelbak, so I'm grateful for the opportunity to refill along the way.  

After we refill our water, we continue on our route, turning off the main road, looking forward to the final leg of our climb.  This last section of the climb is the most difficult, as it's extremely steep, and by this point we're pretty tired from a couple hours exertion in the heat.  Once at the top, we enjoy the trails atop Monte Epomeo, and take another break to enjoy the view of the towns and sea below us.  
Enjoying the view from the top (and the break!).   
Atop Monte Epomeo

Rich enjoying the trail atop Monte Epomeo.  The peak is in the background.  
After playing around a bit on the trails atop Monte Epomeo, we point downhill!  We descend along the trail we followed to the top, turning off this trail into the wood just below the peak of the mountain.  The fast singletrack descent begins here!  The trail follows along the ridgeline from Monte Epomeo to the east.  The trail is lined with trees and brush, and along the way we got nipped by a few thorns.  The trail twists and turns, at one point leading us through an abandoned farm.  The buildings were overgrown with ferns, which covered much of the field that we were riding through.  We continued on, descending the mountain, coming to a rest area for horses, where a local group of riders were having lunch.  Our aluminum steeds pushed on, pointed downhill, and picked up the pace as the slope became steeper.  We ride down through a dark, root covered crevasse that looks as though it belongs in the beginning of Raiders of the Lost Arc.  We finally break out of the forest in Cretaio, where our tires meet asphalt for the first time since we started our descent.  Back on the road, we continue onto a park that sits just above Porto Ischia.  This park is a relatively new cinder cone from the most recent eruption on the island, dating to 1306.  A short climb to the top of the pine tree covered mini-volcano is followed by the final downhill of the day.  Once through the park, we were back on the road just above Porto Ischia where our ride began.  We rode down into the port and stopped off for a well deserved beer and pizza while awaiting our return trip to the mainland.  What a bella giornata on Ischia!  
Alas; Beer and Pizza!  :)

Prophet Upgrade Project: Phase 1

I've had my Cannondale Prophet for over five years, and I've really enjoyed riding it.  That said, I was looking to improve the climbing capability on the bike by changing the rear shock with one that would "lock out".  The original shock, a Manitou, didn't include a lock out feature, and it's something I missed on the Prophet.  A previous bike of mine had front and rear lock out on the shocks, and I really liked being able to make the full suspension bike into a fully rigid bike on the road and on long climbs.  I really enjoyed the feature on that bike (a 2001 Cannondale Jekyll), and as such, I was ready to improve the capability of my  new(er) mountain bike.

I looked at the available rear suspension shocks on the market, and determined that the Fox Float RL would fit the bill, in that it features a lock out, rebound adjustment, and is reasonably priced.  I determined that the Prophet frame required a rear shock to be 7.875 inches long and have 2.0 inches of stroke.  Fox's Float RL came in this variety, so I ordered it online.

Fox Float RL

When the shock arrived in the mail, I was "shocked" to find that the original shock brackets (called shock reducers) didn't fit my new shock.  Searching online, I found that Cambria bike had them available, so I ordered them online.  When they arrived in the mail, I was able to install the new shock!

Needless to say, I've enjoyed the new shock, with a recent ride on Monte Matese allowing me to lock out the rear shock, effectively making my full suspension bike a hard tail to more efficiently climb the 4265 foot ascent.

Next on the list for the upgrade:

  • New wheels: My wheels are in pretty bad shape after 5+ years of use and abuse.  They are overdue for a rebuild.  Do I get all new wheels or just rebuild on the existing hubs?  If I get new wheels, I'm thinking about the Mavic Crossmax ST's.  Clearly, rebuilding on the existing hubs would provide a great ride at a fraction of the price of the Mavics.  ...and I'd also not have white hubs (that will look horrible if I don't keep them spotlessly clean).  As you can tell, I'm leaning toward the rebuild option.  
  • Fork Rehabilitation: my Cannondale Lefty TPC Max is in dire need of some serious maintenance after 3 serious years of use and abuse in Italy and Europe.  These forks work great, but are very difficult to work on if you don't know what you're doing.  Clearly I don't.  :)  Luckily, there's a bike shop back in the states that specializes in fixing and upgrading Lefties.  So, I'm thinking about shipping my fork off to Mendon Cyclesmith for a complete rebuild and upgrade.  I'm thinking about getting the "guts" upgraded to PBR, essentially converting my front shock from spring to air spring, and providing a lock out capability.  

Sunday, June 5, 2011

Trails: This summer's lineup...Stuttgart and Livigno

With summer already here, I'm itching to get out and ride.  Work and family have been keeping me from riding as much as I'd like, but I should have plenty of opportunities to get out and ride this summer.  I'm looking forward to the club rides, as well as any chances to get out and free ride at Potenza.  I'll probably get up to Germany and northern Italy, too.  I will have some training in mid July in Stuttgart, Germany, as such I'm looking at trails around town.  The training will last about a week, so there should be a few opportunities to get out and ride.

Three of the trails I've found that look to be fun around Stuttgart
The wife and I are planning to stop off in France on the way up to Germany, and we'll stop at points in Italy on the way back to Napoli.  We're tentatively planning on stopping at Livigno and maybe in Vicenza.  There's wonderful handmade pottery and plates near Vicenza, and Livigno's riding is some of the best in the Alps (so I've been told!).  Some great trails up there by the looks of it!