Monday, October 15, 2012

Gear: Upgrading the Shop, Il Grotto di Volpe v2.0!

Well, I got a new job, and with it a new house!  Figures: just when you get everything dialed in your house...it's time to move.  So, we moved to Denver, Colorado, which will provide wonderful recreational opportunities on the bikes and on the skis.

First things first: get the shop in order!

The prior owner (original owner) hadn't done much to the house, and this included the unfinished basement.  There was a rudimentary work bench-thingy, but was very inadequate  as it wasn't properly built, and wouldn't withstand any of the forces that come with a work bench, nor was it optimized for storage.  So, I looked online for a suitable plan.  In Saint Louis, I had a prior existing steel framed workbench from which to improve upon; in Denver I'd be starting from scratch.

Panoramic shot of the workshop space before...

Panoramic shot of the workshop after...
I found a design online that inspired my workbench.  It was to be a basic frame, mounted to the concrete basement walls.  The online plans called for a monstrous 16' workbench...and I decided that based upon the material and the space I was building to, I'd simplify it to 8' wide. The original plans that inspired my workbench are here.

Frame for the workbench complete...
So, to avoid any joints in the actual work surface, and to ensure the bench didn't take up too much space, I kept the length at 8'.  I built the worksurface frame, mounted it to the concrete foundation/wall, and attached a couple legs on the front.

The workbench frame mounted to the concrete foundation...
Next, I built a 8' long shelf frame, that fit within the legs supporting the actual workbench.  The upper workbench is 24" deep, with the shelf underneath 21" to fit between the wall/foundation and the legs.  Both frames are mounted to the wall using concrete mounting bolts.  It was fun to get the hammer drill out, the tool necessary to drill the mounting holes in the foundation wall.  :)

Frame for the lower shelf complete...
After building the frame, I took a moment to install adequate electrical plugs behind the workbench.  I "daisy-chained" five plugs together, ensuring more than enough power for the workbench tools, chargers, and anything else I might need to plug in.

Electrical outlets installed behind the workbench...
Following the successful installation of the electrical outlets, I mounted a 4x8 particle board on the wall immediately behind the bench.  I like a full piece of wood rather than drywall, making any installation of mounting hardware or peg board much easier.  I painted it white, too!  I also cut and mounted my plywood work surfaces to both the bench and the lower shelf.  I bought a more expensive hard wood plywood, ensuring the surface would be durable.  

Plywood worksurfaces installed, caster mounted drawers completed,
and particle board installed behind workbench...
Lastly, I built the caster mounted drawers.  The original design called for the sides to be made from 1x6s, however the previous versions I made in Saint Louis were quite a bit taller, so I opted for a slightly larger wood stock: 1x8.  I found that the drawers I built in Saint Louis were a bit too deep, however as I measured my tools and other items that would be in these drawers, I figued the additional two inches of board width would help make a slightly deeper, and hence slightly more practical drawer.  These caster mounted drawers are perfect for storing those large, heavy tools like hammer drills, circular saws, and anything else you want to get out of the way.  Also, take note, that I had mounted the shelf slightly higher than the plans called for to ensure there was enough room for a taller/larger drawer below it.

Workbench and adjacent work areas, including miter saw and bike repair stand


The completed workbench!  Peg board mounted, and tools organized (for the most part).  Fun, practical project.

Workbench completed!  


Bikes: Ultimate Commuter! ...Cannondale Bad Boy

I purchased this bike in fall of 2009.  I originally purchased it in Italy to replace my cyclocross road bike.  I lived atop a mountain (literally) there, and finishing each ride going up my 45 degree drive way was punishing.  So, I thought a bike like this would make it easier to climb.  Especially with a child on the back.  I put a European child seat on the bike, a design I haven't seen available in the US, that allows the seat to be removed with the touch of a button.  So, this bike made it possible to grind up the long hills, a feat I was unable to accomplish on the higher geared road bike.

Turns out this bike is great for commuting, too.  I love it!  We just moved to Colorado, but while we were living in Saint Louis for six months I enjoyed commuting 6 miles each way to work on this bike.  It's great for commuting!  ...in fact, considering that I've been bike commuting regularly for over ten years, I should have bought one sooner!  Instead, I had been riding older, used bikes.  As you'd imagine, I end up spending more time and miles on the commuter bike than my fancy and expensive mountain bikes.  So why did I ride, old, worn out, crappy commuter bikes, bikes I typically rode more often and further than my new, light, and wonderfully functional "recreational" bikes?  I can't answer that, but I did alleviate it!  I bought a Cannondale Bad Boy.

What makes this bike so terrific for commuting?  It's the mixture of mountain and road bike parts...  The frame and drivetrain are from a mountain bike, ensuring the bike is relatively relaxed to ride, and it can easily climb any hill.  The disc brakes offer great stopping power in all conditions.  Oh, don't forget the front suspension, also from it's mountain bike "roots".  You can turn the suspension on or off with the flick of a switch.  Having the ridged fork is great for speed, but when you want to smooth out a rough street, just turn the switch, and you get to enjoy the benefits of suspension.  Meanwhile, the road wheels make this bike incredibly fast!  They're taller, and slimmer...ensuring less rolling resistance.  I've  installed Michelin's Pilot Sport tires, with the Protek HD, to provide better traction on wet roads.  This was key for safety and performance in Italy, where I found the roads to be very slick with even a bit of dew, let alone rain.  So, these tires provided the appropriate traction in a country where they put slick marble in the asphalt!
 
I love this bike, and I look forward to commuting to work in Denver!

Wednesday, May 9, 2012

Spare Parts: How the Local Bike Shop saved the day, time, and money

The culprit
Interesting that I had been looking for a part, and I just couldn't seem to find one for my bike through all the usual means.  See, my rear derailleur broke, a little wheel, referred to as a "pulley" had cracked, ensuring the chain would not effortlessly weave through the device that alternates the gear ratio on my bike.  So, I needed a replacement pulley.  I didn't need anything fancy, and I didn't want to spend too much.  I looked online first to see what kind of parts were available.  I found Pulleys for as much as $130 a pair!  Wow!  Why, you might ask?  I guess because they're ceramic, but probably because someone would be willing to spend so much (a Ben Franklin burning in their pocket, I guess).

Anyway, I found a nice pair of pulleys online for about 20 bucks.  ...But come to findout they were out of stock.  This is a simple part, and I was rather frustrated that the shipping process alone would slow this down a few days, so I wasn't about to wait for some online retailer to stock the thing.  Frustrated, I went down to one of my local bike shops, a rather high end retailer of bikes in the city.  I was doing some errands, so it was easy to drop by and see if they could help out.  No joy.  Turns out they were lacking in Pulleys, too.  Global shortage of derailleur parts?!?  Don't know, but I was kind of frustrated.  Not at the employee, just that it was proving difficult to get a relatively simple machine (my bicycle) running because one lousy pulley was broken and no one seemed to carry a inexpensive replacement.  I guess the bike shops have a hard enough time keeping up with all the non-standard items the bike industry keeps throwing at them: kind of hard to maintain a stock for every part for 29", 26", and 650b wheels, along with 10, 9, 8, and 7 speed drive trains, not to mention mountain, road and many other "styles" of bikes.  So much for keeping it simple.

So yesterday, while on the way home from work, I decided to drop by another bike shop.  I've bought from this shop from time to time, and truth be told, the service that this guy does is bar none.  Top notch.  I figured if anyone was going to have this part, A&M Cycles would.  So, I  cruised on over, talked to Karl, who introduced me to his excess derailleur bin.  I found all sorts of derailleurs, of different makes and different eras.  And low and behold, I found a Shimano 105 derailleur that had been stripped of the other pulley.  So, I was completing the robbery!  I unbolted the other pulley, tossed it in my bag, gave Karl five bucks for him saving the day (which he promised to use on a cold beverage), and headed home.

Thanks to a small, not so glamorous business, I was up and running in no time, and for little money.  If there's a moral to my little experience, it's something about recycling old parts rather than buying fancy new stuff, and more importantly, helping the local guy who helps you.

Saturday, April 28, 2012

Gear: Upgrading the Shop, Il Grotto di Volpe! (Fox Cave!)

With the move back to the States from Italy, we were looking forward to moving back into our house.  Granted, we knew there would be some work associated with cleaning up after the renters, but we also knew that our "fresh start" would also provide an opporunity to work on some things around the house that we never had the opportunity to improve when we were actually living there.  For example, we had talked for years about refinishing the hard wood floors, however this is a daunting task when you actually occupy your house.  What are you going to do, move everything to one side of the house, sand and stain the floors, move everything to the refinished side, and repeat?  Sounded messy and like a lot of work, so as you can expect, it never materialized.  Well, with all of our stuff still in transit and the house empty (sans tenants), we took the grand opportunity to refinish all the floors.  Still quite a mess, however it's a lot easier cleaning up just a few ceiling fans and window sills compared to EVERY ITEM in the house!

So, with this wonderful opportunity to improve some stuff in the house, we decided to also have the basement repainted.  The basement is of the stone variety, without the smooth, dry walls of a poored concrete basement.  Over time mold and mildew had formed on the stone walls, so it was really in need of some Dry Lock paint.  Dry Lock is a special paint that seals up concrete and masonry walls, preventing moisture from seeping in, and also gives a nice clean appearance, as it's a new paint job!  So, with the basement getting a new coat of paint on all the walls and on the floor, I had to gut the workshop...which provided not only an opportunity to get a coat of paint on the walls, but also to rearrange and reorganize how the workshop is layed out.  My workshop was going to get a makeover!

The workshop: Before (Nasty Walls!)

The obvious first step was clearing out all the old cabinets, workbenches, and other items that had collected in the basement.  I was really surprised at the amount of storage I had in the basement, most of which was old kitchen cabinets.  I tore everything out and moved them out to the garage.  With the basement completely empty, the work crew that was also rehabbing our bathroom got to work cleaning and painting the floors and walls of the basement.

Workshop: Before (Too many cabinets!)

Once they were done, the basement looked like new!  Amazing what a new coat of white paint on a wall will do!  The floors were all a nice light gray.  With a nice blank canvas, I started by bringing the workbench and the best couple cabinets back into the shop.  One of the primary issues I was having with the previous version of the shop wasn't just the poor quality of cabinets, but also the amount of cabinets.  I had too much storage space, and too much counter space, to the extent that I was probably storing things that were better off thrown away.  And many of my larger power tools were difficult to get in the cabinets that weren't designed to hold large, heavy electrical tools.  With all that in mind, I decided that less was more.  I only brought down one cabinet to be permenantly installed in the shop, another cabinet to be mounted on casters as a sort of mobile work stand, and plans for improving the workbench to improve it's storage capacity.

The work bench had been just a thick piece of wood mounted on a sturdy steel frame, with under bench storage consisting of setting stuff on the floor or on the one rickety shelf (that consisted of a couple old boards).  While searching for ideas online (gotta love Google's Image Search!), I found some plans on a woodworking sight for sprucing up a work bench.  What immediately caught my eye was the large drawers mounted beneath the work surface, and the large caster mounted boxes designed to roll on the floor and act as heavy duty drawers to store power tools.

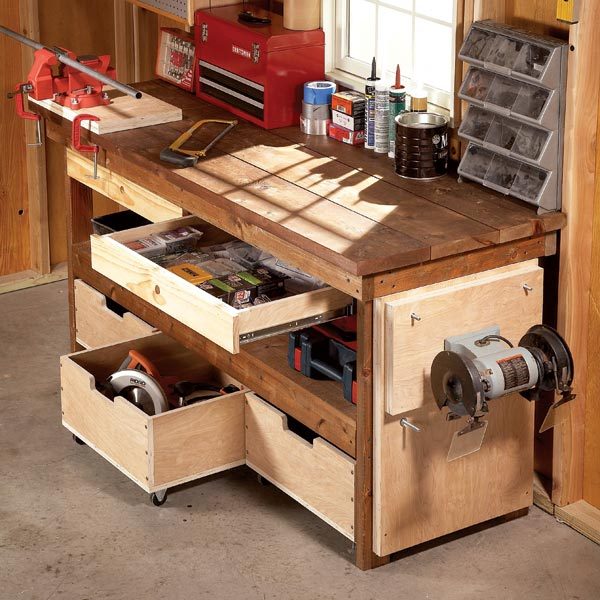
Here's the inspirational photo, from: 
http://www.familyhandyman.com/DIY-Projects/Woodworking/Workbenches/diy-workbench-upgrades/Step-By-Step
So, with an improved workbench in mind, I installed fewer cabinets to make my workshop better.  Almost immediately I noticed that the increased space allowed me to more easily work on projects.  And one of the first projects was improving the workbench.  I cut plywood for the drawers, making them as wide and as long as possible, to maximize storage space for items I'd use a lot, like drill bits, screws and other small hardware.  I kept them fairly shallow, so that they'd remain well organized and not turn into junk drawers.  As for the caster mounted "drawers" that were to roll on the floor, I made them deep enough to allow tool cases to fit securely in them, and long and wide enough to maximize the space under the workbench.  Overall, the four drawers effectively store most of my tools and their accessories.

The improved bench with large drawers mounted below the work surface and two caster mounted boxes (drawers) that roll on the floor and are great for storing large, heavy power tools.  
Closeup of the caster-mounted drawer.

With the workbench project complete, I moved some track lighting above the corner where I planned on setting up the bike rack, ensuring enough light while working on the bikes.  I mounted the one cabinet to the left of the bench, and another smaller cabinet above it, for holding small items and stuff I wanted to keep out of the kids reach, like paints and spray lubricants.  I painted some peg board black, figuring it would offset nice with the new white walls, and also highlight the tools on the board well.

Before
After

On the far side of the shop I installed a double-decker bike rack to hold two bikes, and next to that I installed a wood shelf system from IKEA.  This area had previously held one cabinet that was used to store painting supplies.  The corner wasn't necessarily a mess, but the corner wasn't really "used" in the sense that the stuff stored there was rarely used.  It was kind of a "permanent paint storage" after the wife and I painted.  Storing the paint in the garage freed up the space, ensuring that the new shelves and the bike rack would allow easy access to tools and supplies that were used more often.  My wife described this corner's improvement as looking "less scary".

The "scary" corner, before...
...and After: now with the double-decker bike rack and ample storage thanks to a shelf system from IKEA.
Kitty Corner from the bike repair stand, I cleaned out the area around the work sink, which had previously held floor and wall mounted cabinets to the left of the sink and to the right of the sink a table that held a miter saw.  The previous configuration provided too much storage space, and took up too much of the room.  The saw produced a lot of dust in the basement, so after the basement was painted, I decided to not replace any of the cabinets permanently along this wall, and to keep the miter saw in the garage.  To provide some storage and a more flexible workspace, I built a mobile workstand out of two of the smaller cabinets.  I took two cabinets, one base cabinet and one drawer base cabinet, screwed them together, flipped them upside down and mounted 3/4" plywood base on the bottom.  On the base I mounted four brake equipped casters.  I flipped the now mobile cabinets back over, upright, and screwed 3/4" plywood on the top for a workspace.

I built a duplicate to remain in the garage, which is separated from the house, to hold the miter saw that will spend most of its time out there.  To provide some flexibility with where the miter saw operates, I mounted it on plywood, and drilled a hole in each of the four corners.  I used these holes as guides, drilling matching holes in both of the mobile workbenches, one in the garage and one in the basement shop.  I removed the plywood mounted miter saw, set it on it's side, and glued dowels into the holes, with the dowels facing down, like spikes.  These "spikes" or dowels fit into the mobile workbench and ensure a secure and consistent fit.  

So, eliminating the excess cabinets proved more space for working, and an opportunity to build a more flexible storage and working platform.

Standing by the bike repair stand, looking back: more peg board to hold paint brushes and helmets, work sink, and caster mounted work bench.
I had recently upgraded to a new laptop.  Faster, more storage, all that...  But the old laptop still worked fine, so I thought I might re-purpose it for use in the shop.  Why, you might ask?  Well, for a couple shop specific "tasks".  First, music.  The hard drive on this laptop can hold more than enough music, and with the growing number of songs on YouTube, a WiFi enabled laptop could allow me to enjoy "music videos" while I'm working.  My playlists on YouTube are free, and there's nearly endless variety.   Not to mention Pandora, or many other web based music services.

The second important aspect of making a laptop computer an integral part of the shop is the tremendous number of "How-To"s available on the internet.  From PDFs that explain the intricate details of a suspension fork, to YouTube videos that go step-by-step through the complicated process of bleeding air bubbles from your hydraulic brakes, the notion of having a "shop computer" is priceless.  I had been bringing my nicer laptop into the shop while working on various projects, but I was always worried about getting it dirty or worse broken.  Well, I wanted to repurpose this old laptop so that I wouldn't have to worry about either of those issues.

I thought about building a slide out drawer like device to house the laptop, and while it would have been awesome to have that "disappear" under the work bench, it posed a number of issues.  The laptop would be more permanently affixed to the drawer, reducing the flexibility of having a more portable laptop in the shop.  Which leads to the next issue: where would I mount the drawer mounted laptop?  I would want it accessible so that I could view diagrams while working on the bike, or any other work surface.  As I thought about the practical issues of using a computer in the workshop, I decided on a more mobile solution, and one that would be easier to construct, too.

I built an angled mount for the computer.  It puts the laptop at a 25-30 degree angle, making it easier to type while working, and also shortening the depth of the computer, too, which ensures it takes up less of a footprint on the workbench.  I drilled some holes in the plywood surface that is the mount, to ensure that the computer gets some airflow.  Next, I painted the laptop mount.  Finally, I mounted the laptop's old power cord adapter underneath along with a set of USB speakers.  The entire unit now sits on the workbench, right next to the toolbox, which says a lot about how the rapid access to information improves the ability to fix and maintain just about anything.

The new and improved shop looks cleaner, has better lighting, but features less storage space than its predecessor, which I believe is a better space for actually working on projects.

Completed Shop: improved workbench, laptop computer mount, track lighting above the bike repair stand, with the Fox symbol as the finishing touch!    

Monday, April 16, 2012

Prophet Upgrade Project: Phase II

Well, after returning from Italy, and with a good three years of hard riding on the bike, it was definitely in need of some TLC.  The bike was really in need of two major upgrades or repairs: new rims and an overhaul for the fork.

I had done some research regarding the Prophet's Lefty fork, and I discovered that the TPC Max fork that came equipped with my 2005 Prophet could be upgraded to "PBR" (Progressive Bend Radius...whatever that means?!?).  What a PBR upgrade equated to me was upgrading the fork's spring from an actual "spring" to an air spring, which is more fine-tunable.  Also, most importantly, the PBR upgrade would provide me with a lockout feature on the front fork.  This is a feature I had on my previous mountain bike, a 2001 Jekyll, and it was a feature I rather enjoyed.  It was nice to lock out the fork on climbs or on pavement.  It was surprisingly useful, so it was a feature I was looking forward to getting on my "new" fork.

Top of the new/improved Lefty Fork, showing off the PBR controls.  The blue "Poptop"  activates the lockout and also exposes more of the red Rebound Adjustment knob that surrounds the "poptop".  Pushing the red Rebound knob down reactivates the fork.  Easy!  

As it turned out, much of the maintenance on Cannondale's Headshok forks is now accomplished at the Cannondale factory.  However, my research on the potential for fixing and upgrading my fork also uncovered a small New York based bike shop that specializes in fixing and upgrading Cannondale Headshok suspension systems.  Mendon Cyclesmith is the shop,and Craig is owner, operator, and Headshok expert.  So, I just removed the Headshok Lefty from my Prophet, stuffed it one of the many post-move-from-Italy boxes I had lying around, and shipped it off to NY.  To my pleasant surprise, Craig had it back to me in about a week!  Very fast service.  And the fork feels like new.  It's like butter!  And the added lockout feature is great.  There's a small "pop-top" button to hit, and that's it.  The fork is locked out.  The "pop-top" button releases the compression dampening adjustment knob that is beneath it.  To reactivate the fork, I simply pushing the larger compression dampening knob back down.  Piece of cake!  Actually easier to use than the previous Jekyll's method, which was a dial or switch on the top that had to be turned about a quarter turn to activate/deactivate the fork.  So, this option is battery free and easier than the old switch.  And it looks great, too.

Craig also re-greased everything, and got all the fairly complicated details of the Headshok in perfect working order.  As I said earlier, the fork feels like new, and considering how inexpensive it was for him to service it and upgrade it, I will be getting it service regularly by him, which he and Cannondale recommends to be once a year.

The second upgrade was new wheels!  Well, sort of...  Like the fork, I actually saved most of the wheels, or the most important part, the hubs, and had my local bike shop lace up a new set of rims.  I had been considering a whole new set of wheels, in fact I had started to settle on a sweet set of Mavic wheels.  But rather than go all out and get a new set of Mavics, I figured I spend half as much and get a great set of custom built wheels.  I brought the old wheels, which had slightly bent rims and spokes (did I mention they were well worn?!) and asked to get some Mavic XM819s laced onto the existing hubs.  The next day I received a call from the shop, and was told the XM819s would not be compatible, so they gave me a couple other options to consider.  I took those options to the "internets", and decided upon the "Stan's No Tubes ZTR Arch EX".  Wow. That's a mouthful!  My local bike shop, Big Shark, built them up, and I have to say, they look great!  I have not had the opportunity to give them a proper ride yet, but the test flights in the neighborhood were all successful.

Beautiful new wheels.

So, the Prophet is all set for a new set of adventures in Missouri and where ever else I may find myself!  Happy Trails!

...and a video demonstrating the Cannondale Lefty with PBR upgrade: